Docker containers have a lifecycle that consists of several stages, and understanding this lifecycle is essential for DevOps engineers working with containerized applications.
Towards the end, we have added an image that shows the detailed lifecycle events of a contianer.
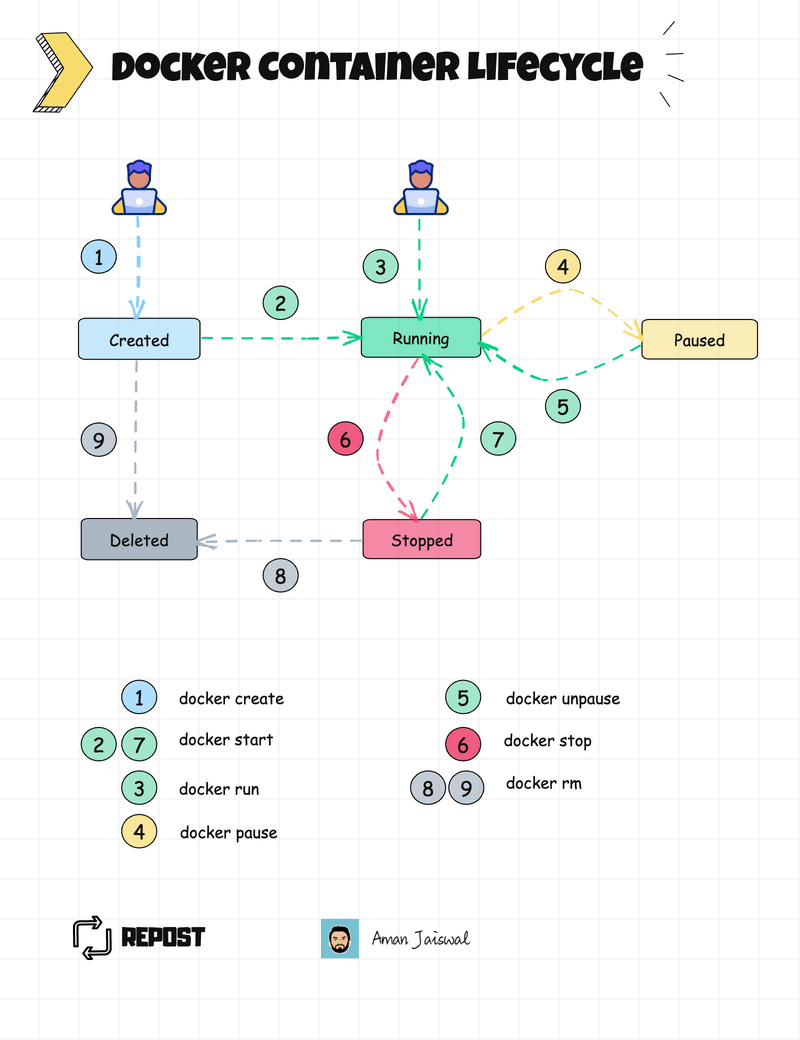
The container lifecycle refers to the different stages a container goes through, from creation to termination.
Let's break it down:
- Container Creation
- Container Running
- Container Paused
- Container Stopped
- Container Deleted
Let's talk about each phase one by one:
1. Container Creation
In this stage, a container is created from an image and the container is only created, not started.
We can use the docker create command to create the container:
docker create --name <container-name> <image-name>2. Container Running
After creation, the container enters the running state. In this state, the application inside the container is executing. To start a container we can use docker start command:
docker start <container-name>We can directly run the container using the docker run command:
docker run -itd --name <container-name> <image-name>
Basically docker run command create and start the container in one go. We can say docker run = docker create + docker start
Here's a list of the actions and operations that can be performed on a Docker container in the running state:
- Exec
- Attach
- View Logs
- Inspect
- View Stats
- Copy Data
- Export/Import
- Commit
- Network Operations
- Monitoring and Debugging
3. Container Paused
Docker allows us to pause a container, which suspends all processes within the container. We might need to pause the containers for maintenance or debugging purposes. To pause a container we can use the docker pause command:
docker pause <container-name>To unpause it:
docker unpause <container-name>Here's the list of actions that can be performed on a Docker container in the paused state:
- Unpause
- Inspect
- Copy Data
- Export
- Commit
- Rename
- Remove
- Prune
4. Container Stopped
In this stage, the container is no longer running, but it still exists in Docker's storage. All the processes running in that container will be stopped. To stop a container we can use docker stop command:
docker stop <container-name>When a Docker container is in the stopped state, the following actions can be performed:
- Start
- Restart
- Remove
- Rename
- Commit
- Export
- Copy Data (from the stopped container's filesystem)
- Inspect (view metadata and configurations)
- Prune (remove unused containers, images, networks, etc.)
A stop container can be started again using the docker start command.
5. Container Deleted
If we no longer need a container, we can remove it from the system using the docker rm command. This frees up the resources used by the container and cleans up Docker's storage. The container must be in the stopped state.
docker rm <container-name>container-id as well instead of container-name.After a Docker container has been deleted (removed), the following actions can be performed:
- Prune
- Inspect (view metadata and logs of the deleted container)
Detailed Lifecycle Events
Here is the image that shows the detailed lifecycle events.
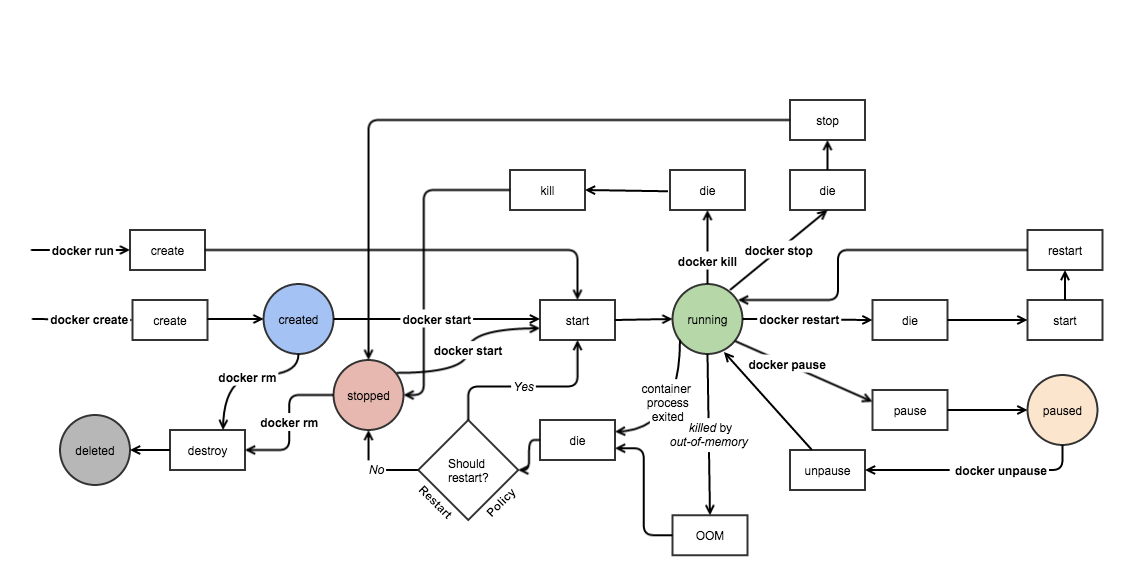
The Docker container lifecycle is designed to be flexible and efficient, allowing us to manage containers throughout their entire lifecycle.
We can create, run, pause, stop, restart, and remove containers as needed, making it easier to manage and scale our applications.