Grype Scanner: Complete Guide to Container Vulnerability Scans
Learn how Grype Scanner secures containers with easy vulnerability scans
— Aswin

In this blog, we will look into the Grype vulnerability scanner. It is an open-source vulnerability scanner designed for container image.
Let's explore its features, benefits, installation, and usage.
By the end of this blog, you'll learn:
- What Grype is and how it works
- Grype’s workflow for vulnerability scanning
- How to scan container images for vulnerabilities using Grype
- Configuring Grype for seamless integration into CI pipelines
- Scanning Software Bill of Materials (SBOM) with Grype
- Creating visually appealing HTML vulnerability reports
Lets get started.
What is Grype?
In the world of DevOps, keeping containerized applications secure is more important than ever. That’s where Grype comes in.
Grype is an open-source tool that helps you find vulnerabilities in container images and filesystems. It’s designed to catch security issues early and keep your applications safe.
What makes Grype special?
For one, it can scan container images stored in remote repositories without needing to download them. It can also analyze SBOM (Software Bill of Materials) files to check for vulnerabilities.
Grype keeps its database updated automatically, using reliable sources like the National Vulnerability Database (NVD), Debian Security Tracker, Red Hat Security Advisories, and other trusted security lists.
How to Install Grype?
Run the following command to install Grype on your system.
curl -sSfL https://raw.githubusercontent.com/anchore/grype/main/install.sh | sh -s -- -b /usr/local/binThis command downalod the Grype installation script and runs the script to install Grypt on the /usr/local/bin directory.
For Mac users,
brew tap anchore/grype
brew install grype
Once it is installed, run the following command to check if it's installed properly.
grype versionIf the installation is successful, this command shows the version of Grype installed in your system.
Grype Scanner Workflow
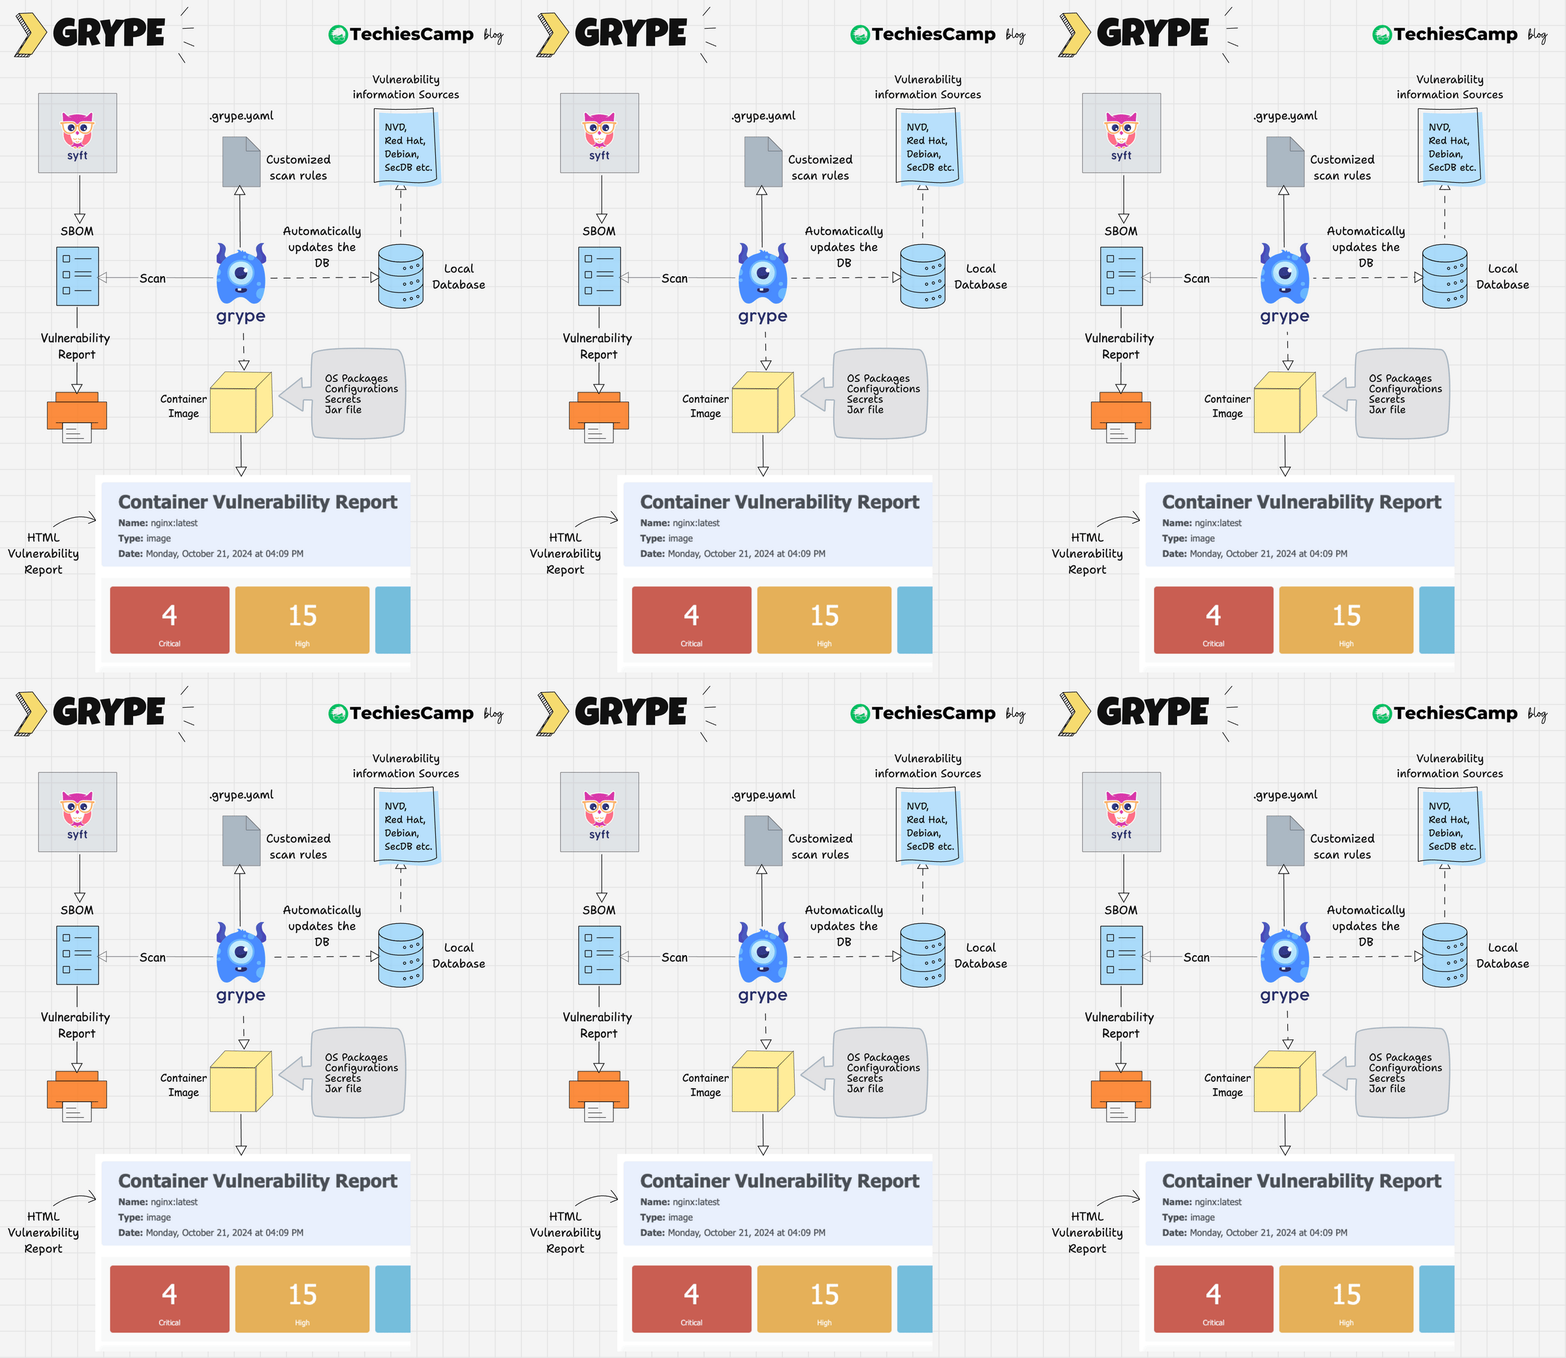
The following image shows the high level workflow of Grype

Here’s how Grype works at a high level:
- Grype maintains a local vulnerability database that is automatically updated.
- The
.grype.yamlfile can be used to set custom scanning rules, such as ignoring specific vulnerabilities or adjusting severity thresholds. - Grype scans container images, filesystems, or SBOMs using its local database and the custom rules.
- It generates a report categorizing vulnerabilities by severity, type, and other configurable parameters.
Scanning Vulnerability using Grype
Once the installation is complete, try to scan vulnerabilities.
Grype can scan for vulnerabilities in Docker images, Filesystems, and even images in remote registry.
Scan Docker Image using Grype
First, let's see how to scan a Docker image with Grype, run the following command to scan a Docker image for vulnerability.
grype <image-name>Grype scans your Docker image and give the output as shown below

You can see that it lists every vulnerability ID and severity.
If you want to fail the scan if a specific vulnerability severity is in your image, run the following command.
grype <image-name> --fail-on criticalThis command scans if the Docker image has a vulnerability with the specified severity and fails the scan if present.
If the vulnerability with the specified severity is present, your scan will fail with the following message
discovered vulnerabilities at or above the severity threshold
Scan Docker Image in Remote Registry using Grype
Grype has the ability to scan for vulnerabilities in a Docker image in a remote registry, so you do not have to pull the image locally to scan the image.
Run the following command to scan the Docker image in a remote registry.
grype registry:<image-name>For example, to scan an image named nginx in a remote registry:
grype registry:nginx:latestScan Filesystems using Grype
You can use Grype to scan vulnerabilities in the filesystem, this means Grype scans binaries, libraries, and other system files that are present in the specified directory for vulnerabilities.
Run the following command to scan Filesystems.
grype dir:<directory-path>This command scans the specified directory and lists any vulnerabilities found in the system files.
Custom Scanning Rules
Grype allows you to create custom scanning rules using a .grype.yaml configuration file. These rules let you:
- Ignore specific vulnerabilities.
- Adjust severity levels.
- Define custom output formats.
Here’s an example .grype.yaml file:
ignore:
  - vulnerability: CVE-2008-4318
    fix-state: unknown
    vex-status: not_affected
    vex-justification: vulnerable_code_not_present
    package:
      name: libcurl
      version: 1.5.1
      type: npm
      location: "/usr/local/lib/node_modules/**"

  - vulnerability: CVE-2014-54321

  - package:
      type: gem
To use this file, place it in the directory where you run Grype, or specify the file path with the --config or -c flag:
grype <image_name>:<tag> -c /<path>/.grype.yaml
Scan SBOMs with Grype
A Software Bill of Materials (SBOM) is a list of all the components, libraries, and dependencies used in a project.
SBOMs help identify potential vulnerabilities in software by showing all the underlying components in the software supply chain.
Grype doesnt create SBOMs.
You can use tools like Syft or Trivy to generate SBOM reports, Grype supports SPDX and CycloneDX SBOM formats.Grype can analyze SBOM generated from container images or filesystems to find vulnerabilities.
Run the following command to scan vulnerabilities using SBOM report
grype sbom:<sbom-report-name>You will get an output as shown below

Get Output using Templates
Grype allows users to customize the report output using templates, which are helpful when integrating Grype with CI/CD pipelines.
You can use custom templates to define how the vulnerability scan results are displayed. Grype allows HTML, CSV, and table formats by default, but you can also create your own custom templates as you like.
You can get template files from the official GitHub repo.
Download the template format you want and run the following command to get the output using the template formate.
For example, let's say you want the scan output format in HTML, download the HTML template, and run the following command
grype <image-name> -o template -t html.tmpl > report.html
I have used the nginx:latest image to get the output in HTML format, got the output as shown below when running the output HTML file

Conclusion
If you look at the 4Cs of cloud-native security, container security plays a key role.
Grype is a versatile tool for vulnerability scanning in containerized applications.
Whether you're scanning Docker images, filesystems, or SBOMs, Grype helps secure your applications with ease. With its automatic updates, remote scanning capabilities, and custom configurations, it’s an essential addition to any DevOps security toolkit.
Now that you’ve learned about Grype, here are a few questions for you:
- Have you tried using Grype in your projects? If yes, what was your experience?
- What other tools do you use for vulnerability scanning, and how do they compare to Grype?
- Do you see Grype fitting into your CI/CD pipeline, and if so, how would you implement it?
- Are there specific challenges you’ve faced with container security that a tool like Grype might solve?
I’d love to hear your thoughts and experiences in the comments! Your feedback and ideas could spark great discussions and help others in the community.