
When it comes to Kubernetes configuration management, Helm is one of the key tools used by many organizations.
This blog covers the following simple but essential pieces of Helm Best Practices you should know when using them in your organization's projects.
- Subcharts
- Identifying images used
- Converting Public images to private images
- Converting helm to manifests
- generating values.yaml from defaults.
Using Community Charts
There is no need to author each and every Helm chart from scratch because we have a lot of official and community Helm charts available that follow all the best practices.
Typically, everyone uses these community charts as a reference or modifies them directly to suit their project requirements while adhering to security guidelines. These customized charts are then hosted in an internal Helm registry (e.g., JFrog, S3, etc.).
However, without understanding the community Helm chart, if you try to install and configure it, you will likely end up troubleshooting extensively without a clear idea of what’s happening.
I have seen this in my projects and in community forums where people raise issues due to a lack of understanding.
For the sake of explanation, we will use the Prometheus Helm Chart as an example.
Understanding SubCharts
Let’s say you install the Prometheus Helm chart. It will install the following components:
- Prometheus Server
- Alertmanager
- Kube State Metrics
- Node Exporter
- Pushgateway
However, the chart includes templates only for the Prometheus Server.
For all other components, such as Alertmanager, Kube State Metrics, Node Exporter, and Pushgateway, they are installed from dependency charts (subcharts).
If you check the Chart.yaml file, you will find the added chart dependencies listed there.
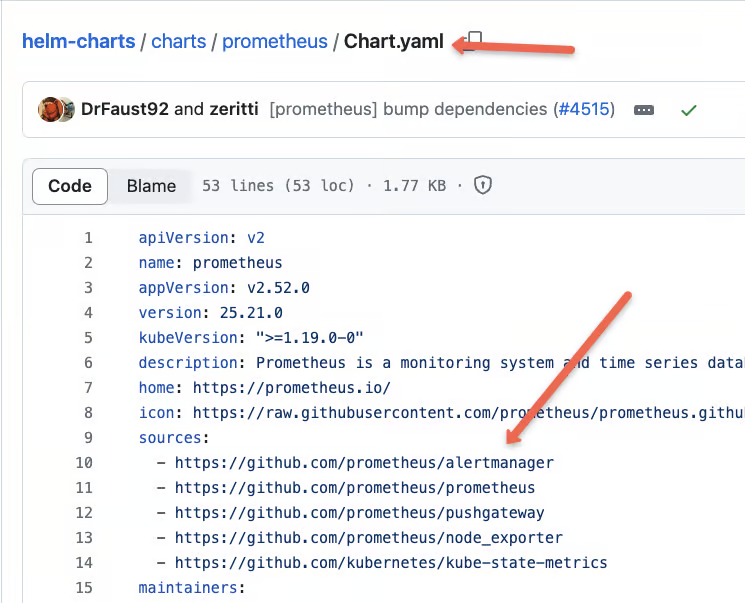
This means that when using the chart in internal project networks, you need to download the subcharts used as dependencies (e.g., Alertmanager, Kube State Metrics, Node Exporter, etc.) from their respective repositories.
After downloading and reviewing these dependency charts (e.g., Alertmanager, Kube State Metrics), move them into the charts/ directory of your main chart.
Next, modify the main Chart.yaml file to remove external dependencies and reference only the local subcharts.
Public Registry Images
All community Helm charts use public registry images by default.
However, organizations that follow strict security compliance will never allow the use of public images.
Instead, you will need to build your own images using the organization’s approved base images. This is because even Docker images must go through patching lifecycles to comply with security standards.
Some organizations may allow the use of official base images, but these too must be patched regularly, typically within 1 to 3 months, depending on the patching lifecycle.
Identifying Images Used
If you take the example of the Prometheus Helm chart, you might assume it only installs the Prometheus components.
However, if you inspect the chart and its subcharts carefully, and list the images used, you will find additional images, such as the Config Reloader image, among others.
For example,
$ helm list-images prometheus-community/prometheus

quay.io/prometheus-operator/prometheus-config-reloader:v0.73.2
quay.io/prometheus/alertmanager:v0.27.0
quay.io/prometheus/node-exporter:v1.8.0
quay.io/prometheus/prometheus:v2.52.0
quay.io/prometheus/pushgateway:v1.8.0
registry.k8s.io/kube-state-metrics/kube-state-metrics:v2.12.0
If you are running the deployment from a corporate network, you might not have access to public images due to network restrictions or security policies.
To deploy the chart in such environments, you should first push these required images to your organization's private container registry.
If security guidelines do not allow you to push community images directly to private registries, you will need to build your own images using the referenced Dockerfiles provided by the community charts.
Convert Chart to YAML Manifest
If you want to understand everything about a Helm chart, such as the objects it creates, the default values, and their configurations, you can convert the chart into YAML manifests.
For example, to view all the YAML manifests of the Prometheus chart, you can convert the chart into plain YAML files using the following command:
$ helm template prometheus-community prometheus-community/prometheus --output-dir prometheus-manifestsHere is the tree structure of the manifest, which will give you a clear idea of all the objects used.
➜  prometheus-manifests tree
.
└── prometheus
    ├── charts
    │   ├── alertmanager
    │   │   └── templates
    │   │       ├── configmap.yaml
    │   │       ├── serviceaccount.yaml
    │   │       ├── services.yaml
    │   │       └── statefulset.yaml
    │   ├── kube-state-metrics
    │   │   └── templates
    │   │       ├── clusterrolebinding.yaml
    │   │       ├── deployment.yaml
    │   │       ├── role.yaml
    │   │       ├── service.yaml
    │   │       └── serviceaccount.yaml
    │   ├── prometheus-node-exporter
    │   │   └── templates
    │   │       ├── daemonset.yaml
    │   │       ├── service.yaml
    │   │       └── serviceaccount.yaml
    │   └── prometheus-pushgateway
    │       └── templates
    │           ├── deployment.yaml
    │           ├── service.yaml
    │           └── serviceaccount.yaml
    └── templates
        ├── clusterrole.yaml
        ├── clusterrolebinding.yaml
        ├── cm.yaml
        ├── deploy.yaml
        ├── pvc.yaml
        ├── service.yaml
        └── serviceaccount.yaml
Default Values
When deploying a Helm chart, it is important to understand the default values defined in the values.yaml file.
If you are using a community chart for your project, you should customize the values.yaml file to meet your specific environment requirements.
For example,
You can extract all the default values from the chart into a values.yaml file using the following command:
helm show values prometheus-community/prometheus > values.yamlTypically projects require different configurations for development, staging, and production environments.
By creating separate values.yaml files for each environment, you can customize settings to suit specific requirements.
For example,
values-dev.yaml: Use small replicas and no persistence for cost-saving.values-prod.yaml: Use high resource limits and enable persistence for reliability.
Chart.yaml Best Practices
Use semantic versioning (e.g., 1.0.0) for both the chart (version) and the application (appVersion).
version: 1.2.3       # Chart version
appVersion: 4.5.6    # Application version
Also, include meaningful description, keywords, and maintainers fields to make your chart discoverable and maintainable.
Testing and Validation
Run helm lint to catch errors and enforce conventions before publishing.
helm lint ./my-chartThis command checks for:
- Proper YAML formatting
- Required fields in Chart.yaml
- Common template syntax errors
- Best practice violations
Before deploying to any environment, use the dry-run feature to verify what Helm will actually generate:
helm install my-release ./my-chart --dry-run --debugConclusion
These are just basic tips to help you save time and follow good practices when working with community Helm charts.
There are many more best practices to consider, but those are beyond the scope of this blog.
Now, over to you!
If you have any doubts about this blog, drop it on the comment!