In modern web applications, authentication plays a crucial role in ensuring secure access to user accounts and resources.
One popular authentication method is OAuth 2.0 protocol, which allows users to access any web application by using third-party authorization server such as Google, Facebook, or Twitter, without directly sharing their credentials.
In this article, we'll explore how to implement Google Authentication using OAuth 2.0 and Passport.js in a Node.js application.
1. About OAuth 2.0 and Passport.js
OAuth 2.0 is the industry-standard authorization protocol which is based on the concept of "granting tokens" to your application. In simple words, once user consent to share his information OAuth grant tokens to websites, so that websites can use this token and access user profile information.
Passport.js
Passport.js is a popular authentication middleware for Node.js applications and adds support to OAuth protocol. Passport.js simplifies the process of implementing authentication by abstracting away the details of different authentication mechanisms and providing a unified interface.
It is important to note that "Passport JS" framework consists of two libraries, one is 'passport.js' and other is strategy library which depends upon the methodology you plan to use to authenticate like 'passport-google-oauth20' (for google), 'passport-facebook' (for facebook) etc.
req.session within Express routes. This integration simplifies the process of managing authenticated user sessions.Therefore, express-session is often used alongside Passport.js to handle session management and maintain authenticated user states effectively.
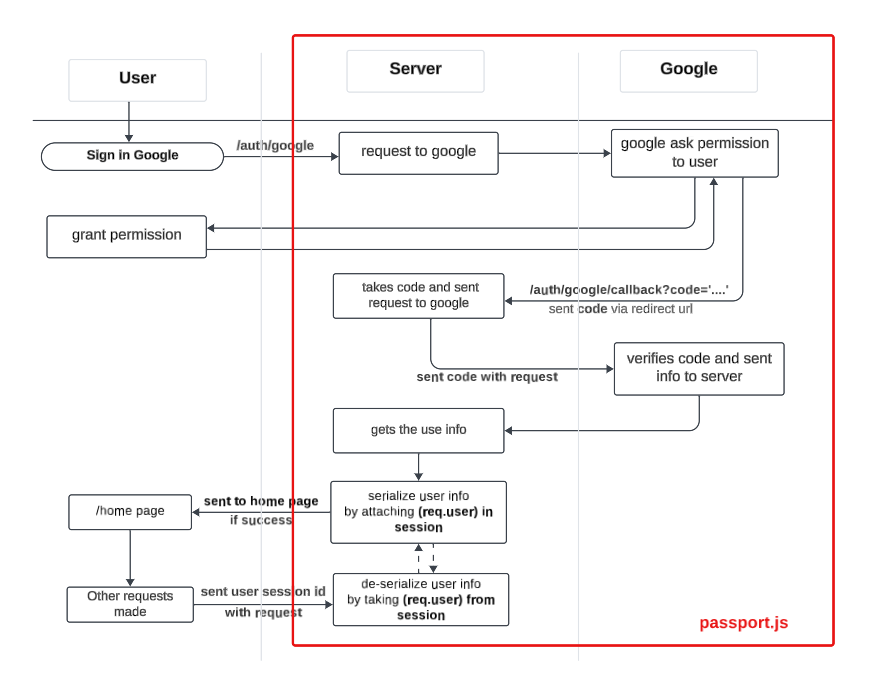
2. Workflow of OAuth 2.0 using Passport.js
The general workflow of OAuth 2.0 using Passport.js involves the following steps:
- User Initialization: The user initiates the authentication process by clicking a "Sign in with Google" button.
- Redirect to Provider's Authorization Server: The application redirects the user to the provider's authorization server (e.g., Google, Facebook) with the required parameters, such as the client ID, client Secret, redirect URI, and the requested scopes (permissions).
- User Grants Permission: The provider presents the user with a consent screen, where the user can review and grant or deny the requested permissions.
- Provider Redirects Back to Application: After the user grants permission, the provider redirects the user back to the application's redirect URI with an authorization code (or access token, depending on the grant type).
- Application Exchanges Authorization Code for Access Token: The application exchanges the received authorization code for an access token by making a request to the provider's token endpoint, along with the client ID, client secret, and other required parameters.
- Application Retrieves User Information: With the obtained access token, the application can make requests to the provider's API to retrieve the user's information, such as name, email, profile picture, etc.
- User Authenticated and Logged In: The application authenticates the user based on the retrieved information and logs them in.
3. Setup of OAuth 2.0 in Google
In order to access Google credentials, you have follow steps below:
- Go to the Google Cloud Platform Console
- From the projects list, select a project or create a new one. Ex: My First Project

- If the APIs & services page isn't already open, open the console left side menu and select APIs & services.
- On the left, click Credentials.
- Click Create Credentials, then select OAuth client ID
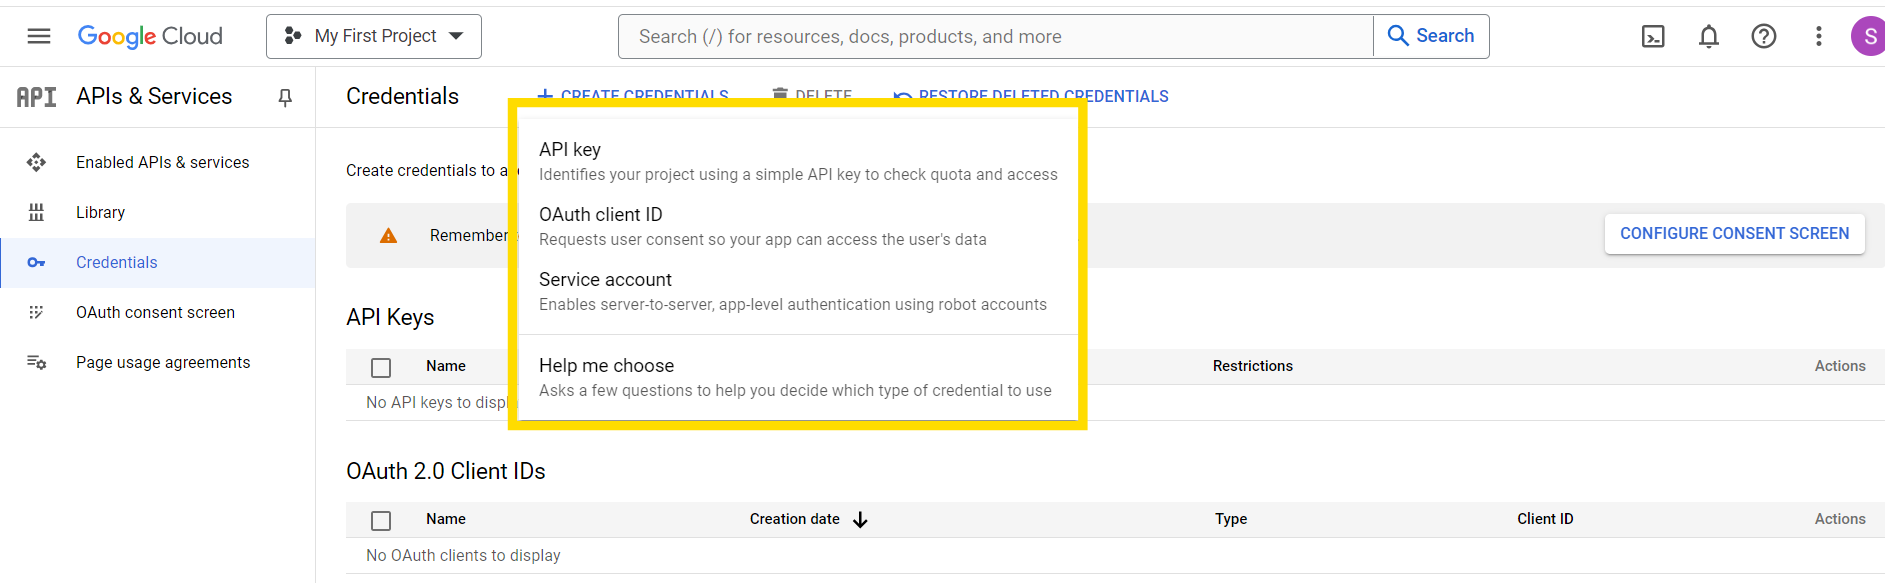
- Select the appropriate application type for your project and enter any additional information required.
- If new project it will redirect to "OAuth Consent Screen" and click "External" for your project.
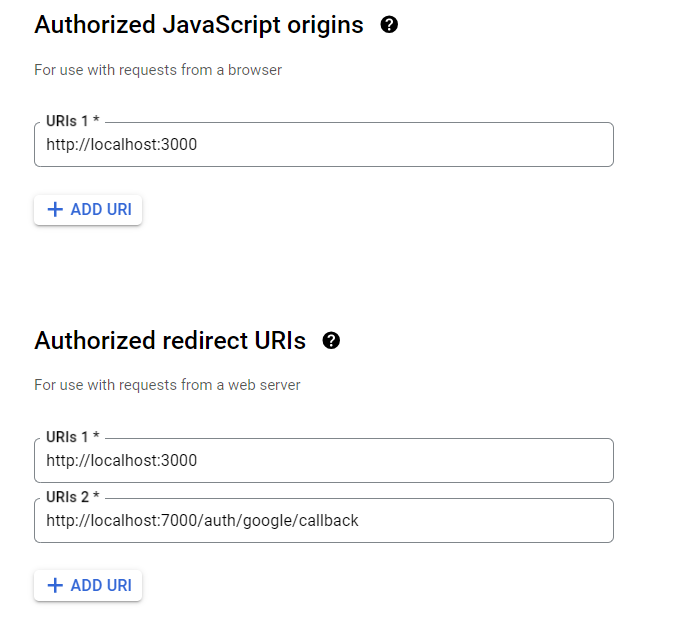
- Go to "Create Credentials" and create appropriate domains based on your website. Here I gave frontend - http://localhost:3000 and redirect url - http://localhost:7000/auth/google/callback . Finally click 'save' and follow through instructions give in the google-console.
- Save Client ID and Client Secret for future use for your website.
4. Steps to create and implement OAuth 2.0 with Node.js and Passport.js
a. Install necessary dependencies in [Backend]:
// To initialize backend server
npm init
npm install express nodemon cors passport mongoose express-session dotenv
b. Create Model for storing user information in Database:
    // Model.js

    const mongoose = require('mongoose');

    const userSchema = new mongoose.Schema({
        userId: String,
        emailId: String,
        displayName: String,
        avatar: {
            data: String,
            type: String
        },
    });

    const User = mongoose.model('User', userSchema)

    module.exports = User;
c. Setup server and MONGODB connection:
  // index.js

    require('dotenv').config();
    const express = require('express');
    const mongoose = require('mongoose');
    const cors = require('cors');
    const passport = require('passport');
    const session = require('express-session');
    const config = require('./config.js');

    const app = express();

    // connect to database
    const mongoUrl = process.env.mongoUrl;
    const db = mongoose.connect(mongoUrl);

    app.use(express.json());
    app.use(cors({
      origin: 'http://localhost:3000',
      methods: ['GET', 'POST', 'DELETE', 'PUT'],
      allowedHeaders: ['Content-Type', 'Access-Control-Allow-Credentials'],
      credentials: true // mandoatory for google auths
    }));

    // session middleware
    app.use(session({
      secret: config.session.secret,
      resave: false,
      saveUninitialized: false,
    }));

    // passport middleware
    app.use(passport.initialize());
    app.use(passport.session());

    app.listen(7000, (err, client) => {
      if(err) return console.log('Server not connected: ', err);
      console.log("Server is connected at PORT: 7000");
      if(db) {
        console.log('MongoDB is connected');
      }
    })
The order of middleware is important when working with passport and session middleware. The middleware setup in this application involves several key components that will ensure the security and functionality of the application.
First, the express.json() middleware is used to parse incoming requests with JSON payloads. This middleware handles requests sent from the client to the server.
Second, the cors() middleware is used to allow cross-origin resource sharing between the client and server. The credentials flag is set to true to allow the client to send cookies to the server.
Third, the session middleware is used to store user session data on the server. The secret used to sign the session ID cookie is taken from the .env file and stored in config variables. The resave and saveUninitialized flags are set to false to ensure that the session is not saved even if no changes are made to it.
Lastly, the passport.initialize() and passport.session() middleware are used to set up passport authentication.
- passport.initialize() is used to initialize the passport middleware and when user click the 'sign in google' button the passport middleware gets triggered, verifies user and send data to passport.session(). It initiates passport on every route call.
- passport.session() middleware which is responsible to allow express-session middleware store user info in session
d. Setup Passport.js configuration:
  // passport.js

  const passport = require('passport');
  const User = require('./Model/user');

  const GoogleStrategy = require('passport-google-oauth20').Strategy;
Import "passport" and "passport-google-oauth20" library. Also import user-model to store the user info in database.
  passport.use(new GoogleStrategy({
            clientId: process.env.GOOGLE_CLIENT_ID,
            clientSecret: process.env.GOOGLE_CLIENT_SECRET,
            callbackURL: process.env.GOOGLE_REDIRECT_URI
        },
        async function(accessToken, refreshToken, profile, done) {
            try{
                let user = await User.findOne({userId: profile.id})
                if(!user) {
                    user = await User.create({
                        userId: profile.id,
                        displayName: profile.displayName,
                        avatar: {
                            data: profile.photos[0].value,
                            imgType: 'image/png'
                        },
                        emailId: profile.emails[0].value,
                    });
                }
                return done(null, user)
            }
            catch(err) {
                return done(err, null)
            }
        }
    ));
In this code snippet, set up the Google authentication strategy using Passport.js. The GoogleStrategy object is created with the clientID, clientSecret, and callbackURL obtained from the Google API Console..
The function(accessToken, refreshToken, profile, done) is called after the user is authenticated by Google. Inside this function, we check if the user with the given Google ID exists in our database. If the user does not exist, a new user is created with the googleId, profile-image and username from the user's Google profile, and the new user is saved in the database.
The “done()” function is callback function which once the user is authenticated, it is then used to pass the “authenticated_user” to the serializeUser() function.
Here is where passport.initialize() is stopped and triggers passport.session() middleware. passport.session() is responsible to allow the use of express-session middleware.
  passport.serializeUser((user, done) => {
        done(null, user._id);
    });

    passport.deserializeUser(async(id, done) => {
        try{
            const user = await User.findById(id);
            done(null, user);
        }
        catch(err) {
            done(err, null);
        }
    });
When app.use(passport.session()) invokes, the express-session creates "req.session" object. The serializeUser function takes a user object and stores its _id property in the session. Here serialize(..) will take the user id and stores it internally on req.session.passport. The deserializeUser function takes an id and retrieves the corresponding user object from the database using User.findById() and attaches it to the request object as req.user. This allows you to easily access the authenticated user's information in subsequent requests.
e. Setup google auth route handlers:
// index.js
  .
  .
  .
  app.get("/auth/google", passport.authenticate("google", {scope: ["profile"]}));

  app.get("/auth/google/callback", passport.authenticate("google", {
      successRedirect: 'http://localhost:3000", // to client
      failureRedirect: "auth/login/failed"
    })
  });

  app.get('/auth/login/success', async(req, res) => {
      return res.status(200).json({
          success: true,
          message: "successfull",
          user: req.user,
          corrId: req.headers['x-correlation-id']
      })
  });

  app.get('/auth/login/failed', async(req, res) => {
      return res.status(401).json({
          success: false,
          message: "failure"
      })
  }
  .
  .
The authentication endpoint "/auth/google" is set up with passport.authenticate() middleware that redirects the user to Google's OAuth consent screen and requests permission to access the user's profile information.
The callback endpoint "/auth/google/callback" is set up to handle the callback from Google after the user has authenticated. If the authentication was successful, the user is redirected to the CLIENT_URL, which can be specified in the environment variables. If the authentication failed, the user is redirected to "/auth/login/failed", if it is success user is redirected to '/' home page of browser and on client-side we can setup code as below to retrieve user information.
f. Client-side verification:
  // App.js
  // -------------------------
  import './App.css';
  import React, { useEffect, useState } from 'react';
  import { Route, Routes } from 'react-router-dom';
  import axios from 'axios';
  import Header from './components/Header/Header';
  import Login from './pages/Login/Login';
  import Home from './pages/Home';
  import Footer from './components/Footer/Footer';

  function App() {
    const [user, setUser] = useState(null);
    useEffect(() => {
      axios.get(`http://localhost:7000/auth/login/success`, {
        withCredentials: 'include',
        headers: {
          'Content-Type': 'application/json',
          'Access-Control-Allow-Credentials': true
        }
      })
      .then(response => {
         setUser(response.data.user)
      })
    },[user])

    return (
        <div className='App'>
          <Header userInfo={user}/>
          <Routes>
            <Route exact path='/' Component={Home} />
            <Route path='/login' Component={Login} />
          </Routes>
          <Footer />
        </div>
    );
  }

  export default App;
Hope this article helps you to write code of user authentication using passport.js and OAuth 2.0 in MERN stack project.
I am Full Stack Developer and AI/ML enthusiast, specializing in integrating machine learning models into full-stack web applications and creating intelligent and dynamic user experiences.