
In this blog, we will learn how to run containers as a non-root user by configuring Dockerfiles, managing permissions, and addressing real-world application challenges.
To run a container as a non-root user, you just need to create and add the USER instruction specifying the non-root user.
RUN groupadd -g 1001 flaskgroup && \
    useradd -u 1001 -g flaskgroup -m flaskuser

USER flaskuser
In real-world projects, it's more than just this.
You must understand how the application and its configuration work. Also, you need to ensure that the non-root user can handle all application requirements, such as reading and writing to files or accessing configurations.
Host root vs. Container root
Host root and container root are not the same in terms of host resource access.
Let’s break this down with some examples to make the difference clearer.
Host Root User
The root user on the host system has complete control over all resources and processes on that system. The host root can access any files, run any commands, install or uninstall software, and change system configurations.
Essentially, they are the ultimate administrator of the host.
Container Root User
The root user inside a container has similar privileges within the container.
Even though the container root user appears to be like the host root user, it is isolated in many ways.
Note: Container root (UID 0) is the same as host UID 0 unless user namespaces are explicitly configured.
This means that while it has root privileges within the container, it does not have direct access to the host system's resources due to Namespace, Control groups, and security profiles like seccomp.
This means that the container runtime removes some special permissions (called capabilities) and blocks specific system calls (using seccomp) to make the container environment more secure, even though the user ID (UID) remains the same inside the container and on the host.
For example,
$ docker run -it ubuntu

root@0295ecbcec17:/# mount -t tmpfs none /mnt
mount: /mnt: permission denied.
       dmesg(1) may have more information after failed mount system call.

root@0295ecbcec17:/# dmesg
dmesg: read kernel buffer failed: Operation not permitted
However, if you explicitly allow privileges through capabilities or the --privileged flag, the container root will have access to the host (e.g., through volume mounts or network configurations).
You can directly mount host filesystems, change host kernel parameters, write to system files, and access or modify them.
For example,
# Explicitly allowing access to the host filesystem

$ docker run --privileged -it ubuntu

root@ff566015378b:/# mount /dev/sda1 /mnt

root@ff566015378b:/# cd /mnt/

root@ff566015378b:/mnt# ls
EFI

root@ff566015378b:/# sysctl -w net.ipv4.ip_forward=1
net.ipv4.ip_forward = 1

root@ff566015378b:/# echo 1 > /proc/sys/net/ipv4/ip_forward
Now, let’s say you are running a container without privileged mode.
However, there is still a risk: if a container running as root is compromised, vulnerabilities may allow an attacker to break out of the container and gain host-level access.
This is why running containers as root is strongly discouraged
Running Containers as Non-Root User
Now, let's look at what you need to know to run containers as non-root users.
Creating a non-root user
The first step is to create a non-root user.
The groupadd and useradd commands create a new user (flaskuser) and group (flaskgroup) with a fixed UID and GID (e.g., 1001 - commonly used as a UID for a non-root user).
Note: UIDs 1000 and above are generally assigned to non-root users (regular users). Many Linux distributions assign UIDs starting from 1000 or 1001 to non-root users by default. The UID 0 is reserved for the root user. You can check these ranges on your specific system by looking at the /etc/login.defsFor example,
RUN groupadd -g 1001 flaskgroup && \
    useradd -u 1001 -g flaskgroup -m flaskuser
File permissions
When you run applications, they often expect to write to specific directories. It could be a log file or a runtime configuration file.
You need to ensure proper ownership and permissions are set during the image build process.
For example, let's say your app wants to write logs to /app/logs. In that case, your non-root user configuration would look like this:
RUN mkdir -p /app/logs && \
chown flaskuser:flaskgroup /app/logs && \
chmod 755 /app/logs
Port binding
Non-root users can't bind to privileged ports (ports < 1024).
Services like Nginx, by default, accept connections on port 80. Additionally, if you check the standard Nginx images, you will find that they are configured to run as root by default.
For example, if you run a Nginx container and check its processes, you can see that the master process is running as root.
$ docker run -d --name nginx nginx

f5896b56bbbdcca7d8....

$ docker top nginx | awk '{print $1, $8, $9}'

UID CMD
root nginx: master
systemd+ nginx: worker
Now, if you want to run apps like these as non root., you need to change the default port to another port, let's say 8080, during the build time.
For example,
RUN sed -i 's,listen 80;,listen 8080;,' /etc/nginx/conf.d/default.confNote: If you want to configure the application to use lower ports (ports < 1024), although highly discouraged, you need to use capabilities likeCAP_NET_BIND_SERVICE(which should be used cautiously) without giving full root access or running the entire container asroot
Service Dependencies
Let’s say you want to containerize an application that assumes it can write logs to a system directory like /var/log/ (which requires root).
Additionally, it communicates with another process through /var/run/ for inter-process communication (IPC), which also requires root.
In these cases, you might want to configure the application or refactor it to write to different locations. For example:
- Logs are written to
/app/logsinstead of/var/log. - IPC files are created in
/app/runinstead of/var/run.
In the Dockerfile, the application runs as appuser, a non-root user created during the build process. Ownership of /app/logs and /app/run is granted to appuser.
For example:
ENV APP_USER=appuser
ENV LOG_DIR=/app/logs
ENV RUN_DIR=/app/run

# Create a non-root user
RUN useradd -ms /bin/bash $APP_USER

# Create alternative directories for logs and runtime files
RUN mkdir -p $LOG_DIR $RUN_DIR \
    && chown -R $APP_USER:$APP_USER $LOG_DIR $RUN_DIR
Configuration Files & Runtime directories
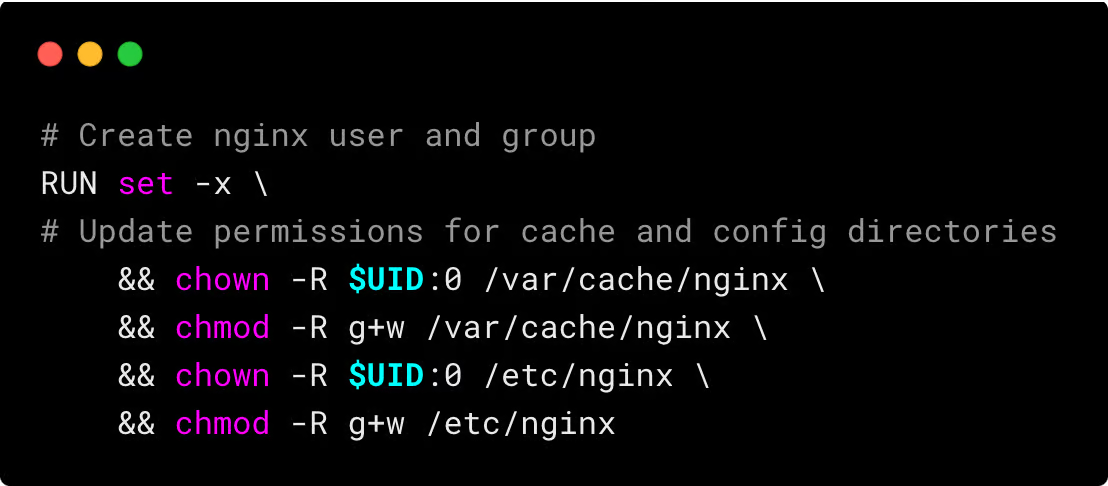
There are applications that often assume root access and expect to create or modify directories in locations requiring root privileges.
For such applications, you might need to:
- Allow non-root user access to those directories or files.
- Pre-create directories with the correct permissions.
- Configure alternative paths for files and directories.
The Nginx Unprivileged Dockerfile is a classic example of this scenario. It is configured to run Nginx as a non-root user.
For example,
Example Flask App Non-Root Dockerfile
Here is an example Dockerfile that uses a non-root user for your reference:
It changes ownership of /app to a user with:
- UID: 1001
- GID: 1001
This prepares the directory for use by the non-root user.
It then switches to the non-root user with UID 1001 for subsequent commands.
FROM python:3.11-slim

WORKDIR /app

RUN apt-get update && apt-get install -y --no-install-recommends \
    curl \
    && rm -rf /var/lib/apt/lists/*

# Create a non-root user with UID 1001 and GID 1001, and set permissions
RUN mkdir -p /app && \
    chown -R 1001:1001 /app

# Switch to the non-root user with UID 1001
USER 1001:1001

COPY --chown=1001:1001 requirements.txt .

RUN pip install --no-cache-dir -r requirements.txt

COPY --chown=1001:1001 . .

EXPOSE 5000

CMD ["python", "app.py"]
Container non-root Vs. Kubernetes Non-root User
Now, let's say you have a non-root user configured in the container.
What happens when you deploy it in a Kubernetes pod?
How does Kubernetes treat the non-root user configured in the container?
Here is a detailed guide about Kubernetes Pods With SecurityContext.
If you have any questions about this blog, drop them in the comments!