
Ghost is an open-source publishing platform. You can use the managed Ghost(Pro) service, or run Ghost yourself on your own server.
This guide focuses on the second option. We'll start with a fresh Ubuntu server and a domain name, then set up a live Ghost blog with HTTPS and email, using Self-Hosted Ghost.
I will use devopsproject.dev as the example domain. You can replace it with your own domain throughout the guide.
The stack is Ubuntu 24.04 LTS, Nginx, MySQL 8, Node.js 22 LTS, and Ghost-CLI.
Ghost-CLI is the recommended tool for setting up and managing a production Ghost installation, including Nginx, SSL, MySQL, and systemd configuration.
Why Self-Host Ghost?
With a self-hosted Ghost setup, you have complete control over your server and data. You can SSH into the server to access the database, manage your theme files, and customize the configuration to meet your specific needs.
However, this also means you take on the responsibility for the server's maintenance. You will need to handle updates, backups, security measures, and troubleshooting.
This added responsibility is the trade-off for having full control over your setup.
Ghost Key Components
A self-hosted Ghost setup runs three main services on a single server, as illustrated in the image below:
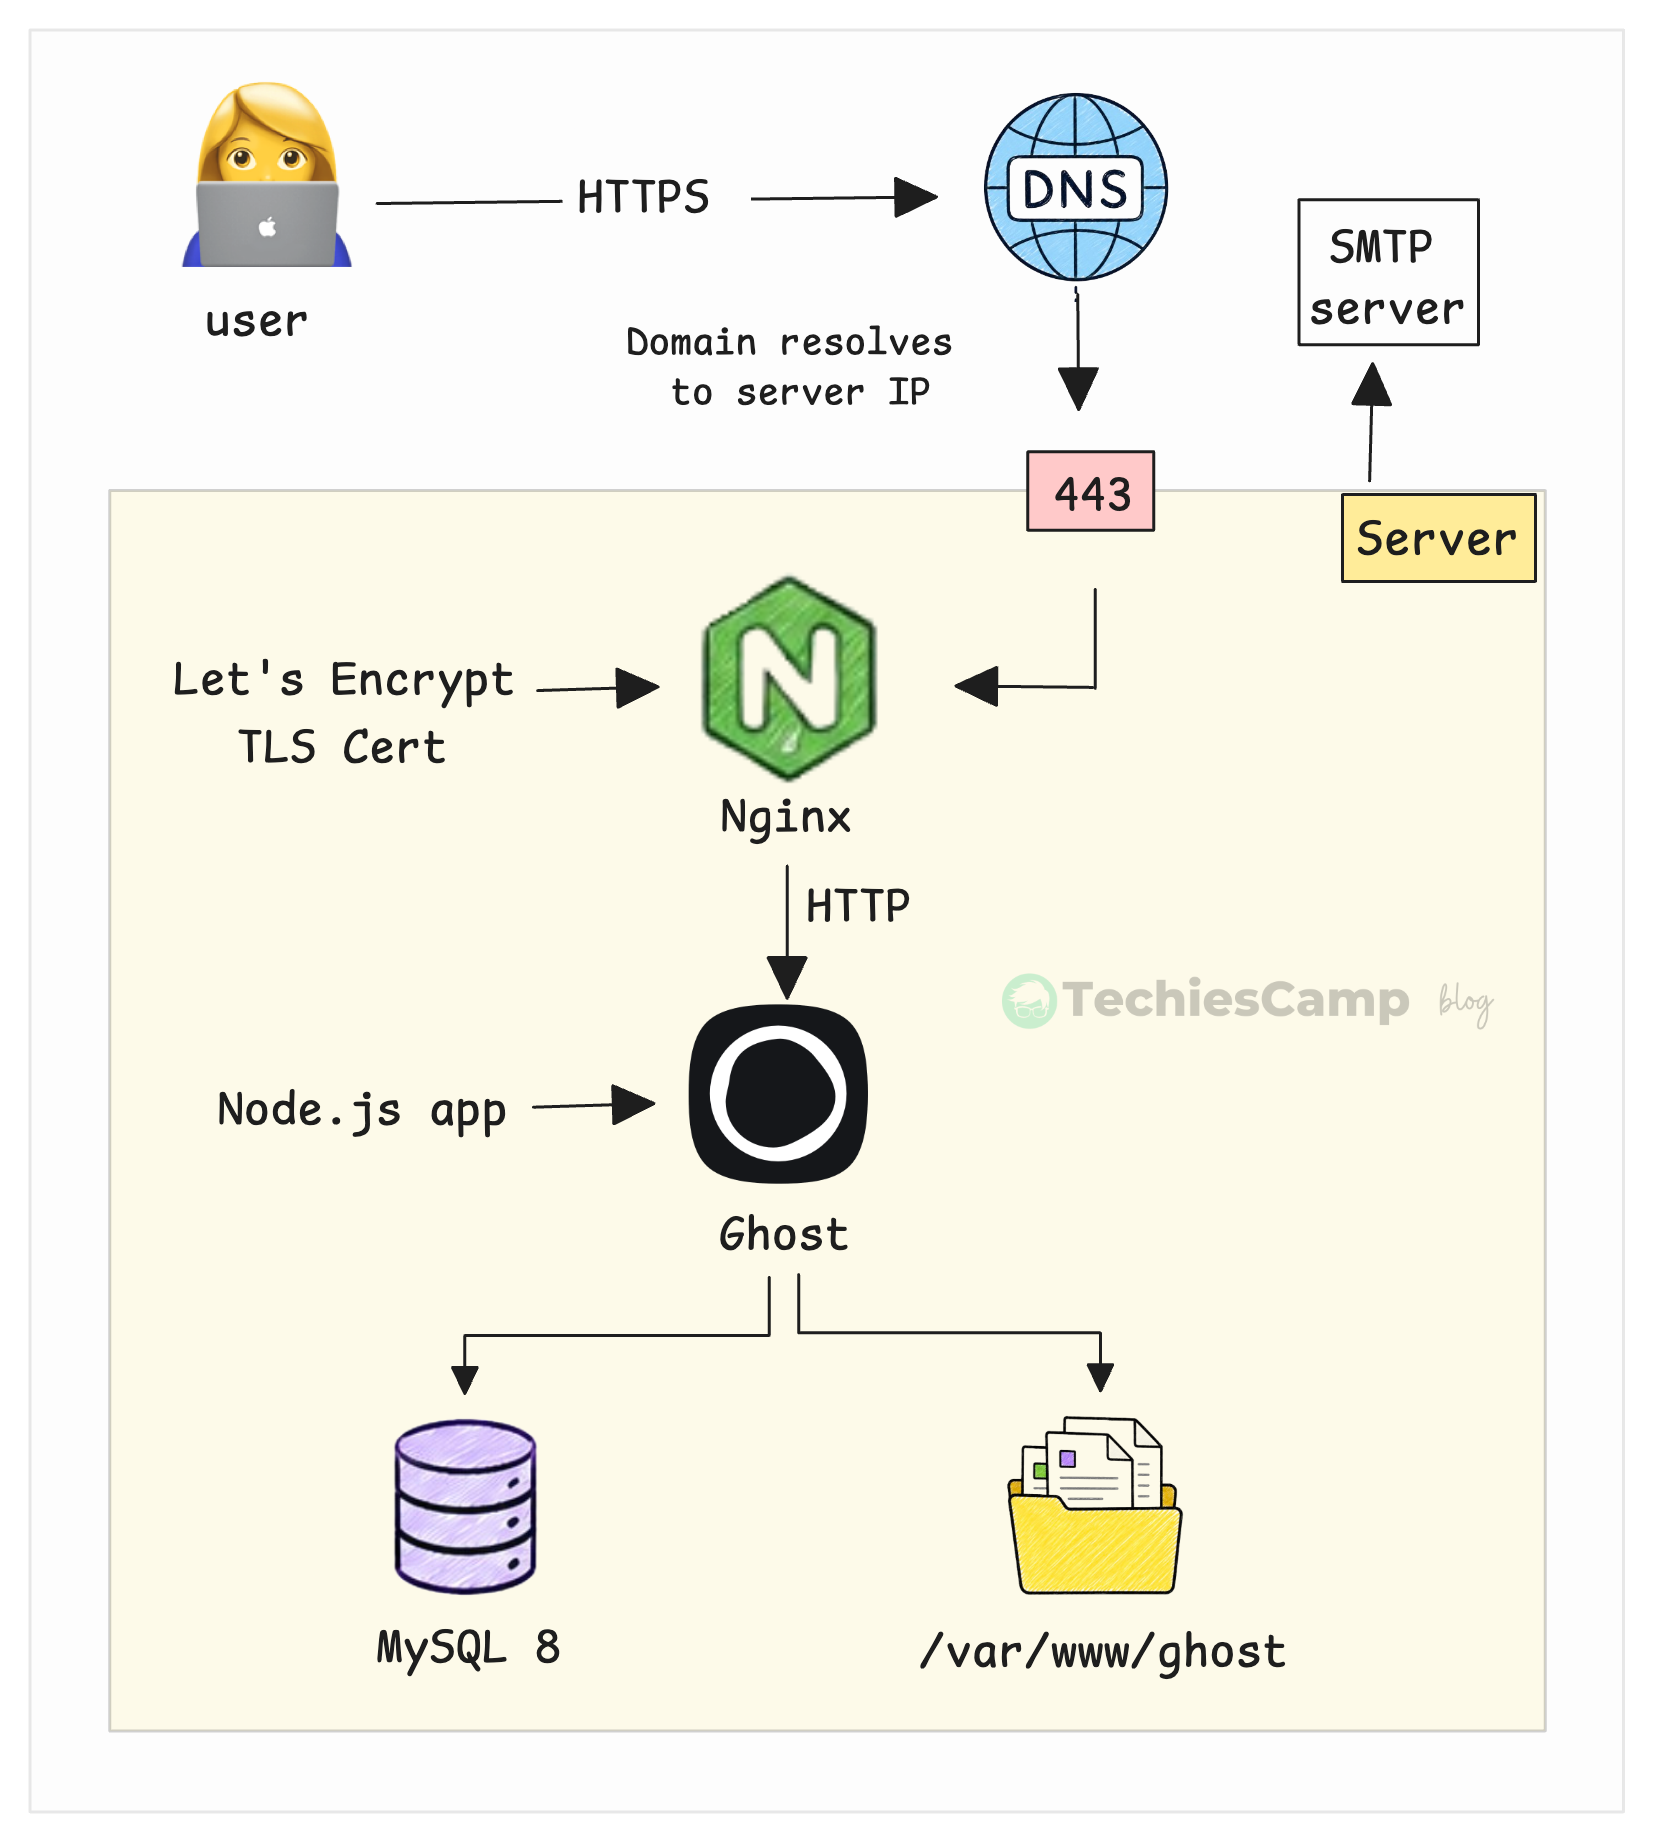
Here are the three services:
Nginx: It is the public entry point for the server. Every web request reaches Nginx first. It handles HTTPS, redirects HTTP to HTTPS, serves static files, and forwards application requests to Ghost.
Ghost itself runs as a Node.js application on 127.0.0.1:2368. Because it listens only on localhost, it isn't directly reachable from the internet. Nginx is the only service that needs to be publicly accessible.
Ghost application: Ghost runs as a Node.js process on 127.0.0.1:2368. It handles the actual blog, including your theme, the /ghost admin panel, APIs, member signups, and scheduled posts.
systemd manages the Ghost process, so it starts automatically after a reboot and can restart if the process crashes.
MySQL: It also listens only on localhost and stores your posts, pages, users, members, subscriptions, and settings.
One important detail that your uploaded files and themes are not stored in MySQL. They live on disk inside Ghost's content/ directory.
So when you back up Ghost, you need both the MySQL database and the content/ directory. Missing either one can leave you with an incomplete restore.
Prerequisites
Before installing Ghost, make sure your server has the following:
- Ubuntu 24.04 LTS: 2 vCPUs, 4 GB RAM, and at least 40 GB of disk space.
- A domain name: pointed to the server’s public IP address.
- Amazon SES: configured for sending emails from Ghost.
For a clean setup, use a fresh Ubuntu server with SSH and sudo access.
Why Ubuntu 24.04 LTS?
Ubuntu 24.04 LTS is a good choice for this setup because it is officially supported by Ghost and gives you a stable base for running the platform.
You could use other supported Ubuntu LTS versions, but for this guide we will use Ubuntu 24.04 LTS. It provides a current, stable environment for the rest of the stack, including Nginx, MySQL 8, Node.js 22, and Ghost.
1. Secure and Prepare the Ubuntu Server
Before installing Ghost, we need to prepare the Ubuntu server. We will create a non-root user with sudo access, update the system, and add swap to help the server handle temporary memory usage.
Create a Non-Root Sudo User
Ghost should not be installed or managed as root. Ghost-CLI requires a regular user with sudo access, which also limits the damage if something goes wrong with the application.
Create a user and give it sudo access:
adduser ghostadmin
usermod -aG sudo ghostadmin
su - ghostadmin
adduser will ask for a password and a few optional details. You can leave the optional fields empty.
Verify the User
Make sure you're now using the new account:
whoami
sudo whoami
You should see:
ghostadmin
root
If sudo whoami doesn't return root, check that the user was added to the sudo group correctly.
Update the System and Add Swap
First, update the server and install the latest security patches. Then create a 2 GB swap file.
Swap uses disk space as backup memory when RAM gets tight. It's slower than RAM, but it can help prevent Ghost or MySQL from being killed during short memory spikes.
sudo apt update && sudo apt upgrade -y

sudo fallocate -l 2G /swapfile
sudo chmod 600 /swapfile
sudo mkswap /swapfile
sudo swapon /swapfile
echo '/swapfile none swap sw 0 0' | sudo tee -a /etc/fstab
The last line makes the swap file persistent across reboots. Without it, the server would lose the swap configuration after a restart.
Verify the Setup
Check that swap is active:
free -hThe Swap row should show around 2.0 GiB.
$ free -h

               total        used        free      shared  buff/cache available
Mem:           3.8Gi       1.2Gi       341Mi       4.0Mi       2.6Gi       2.7Gi
Swap:          2.0Gi       268Ki       2.0Gi
2. Install the Ghost Server Stack
Now that the server is prepared, we can install the main components Ghost needs to run. We’ll set up Nginx, MySQL 8, and Node.js 22 LTS, then verify each service before moving on to the Ghost installation.
Install Nginx
Nginx will sit in front of Ghost and handle incoming web traffic. Ghost runs as a Node.js process on localhost:2368, so Nginx acts as the public-facing web server and forwards requests to Ghost.
Use the following command to install Nginx:
sudo apt install -y nginxYou don't need to create an Nginx server block manually. Ghost-CLI will create the required configuration later.
Verify Nginx
Check that the service is running using the following command:
sudo systemctl status nginxIt should show:
$ sudo systemctl status nginx
● nginx.service - A high performance web server and a reverse proxy server
     Loaded: loaded (/usr/lib/systemd/system/nginx.service; enabled; preset: enabled)
     Active: active (running) since Wed 2026-08-19 09:25:00 UTC; 1h 17min ago
       Docs: man:nginx(8)
   Main PID: 24159 (nginx)
      Tasks: 3 (limit: 4653)
     Memory: 6.0M (peak: 6.9M)
        CPU: 1.247s
     CGroup: /system.slice/nginx.service
             ├─24159 "nginx: master process /usr/sbin/nginx -g daemon on; master_process on;"
             ├─30794 "nginx: worker process"
             └─30795 "nginx: worker process"

Aug 19 09:25:00 Ghost-test systemd[1]: Starting nginx.service - A high performance web server and a reverse pr>
Aug 19 09:25:00 Ghost-test systemd[1]: Started nginx.service - A high performance web server and a reverse pro>
lines 1-15/15 (END)
Then test the local web server:
curl -I http://localhostYou should get an HTTP response such as:
HTTP/1.1 200 OKYou can also open http://yourdomain.com in your browser. At this stage, you should see the default Nginx welcome page.
If the page doesn't load, check your DNS and firewall rules before moving to the next step.
Install and Secure MySQL 8
Ghost uses MySQL 8 as its production database. It stores important data such as posts, pages, users, and settings, so we'll install it and remove the default insecure settings.
Install MySQL and enable the service:
sudo apt install -y mysql-server
sudo systemctl enable --now mysql
sudo mysql_secure_installation
Run the MySQL security setup and answer the prompts to remove anonymous users, disable remote root login, remove the test database, and reload the privilege tables.
Set a strong root password and keep it safe, as you'll need it during the Ghost installation.
There is one important step on Ubuntu that is easy to miss. MySQL root usually uses socket authentication, which means the Unix root user can log in without a MySQL password.
Ghost expects password authentication, so we need to change this before running ghost install.
sudo mysqlThen run:
ALTER USER 'root'@'localhost' IDENTIFIED WITH 'caching_sha2_password' BY 'your-new-root-password';
FLUSH PRIVILEGES;
exit
Replace your-new-root-password with the password you chose.
Verify MySQL
Check that MySQL is running:
sudo systemctl status mysqlThen test password authentication:
mysql -u root -p -e "SELECT VERSION();"Enter the password when prompted. The version should start with 8.
Finally, make sure MySQL isn't exposed to the internet:
sudo ss -tlnp | grep 3306You should see it listening on:
127.0.0.1:3306This keeps MySQL accessible only from the server itself.
Install Node.js 22 LTS
Ghost 6 requires Node.js 22 LTS, so we need to install the correct version before continuing. Ubuntu may provide an older Node.js version, so we'll use NodeSource instead.
First, add the NodeSource repository:
sudo apt-get update
sudo apt-get install -y ca-certificates curl gnupg

sudo mkdir -p /etc/apt/keyrings

curl -fsSL https://deb.nodesource.com/gpgkey/nodesource-repo.gpg.key | \
  sudo gpg --dearmor -o /etc/apt/keyrings/nodesource.gpg

NODE_MAJOR=22

echo "deb [signed-by=/etc/apt/keyrings/nodesource.gpg] https://deb.nodesource.com/node_$NODE_MAJOR.x nodistro main" | \
  sudo tee /etc/apt/sources.list.d/nodesource.list

sudo apt-get update
sudo apt-get install -y nodejs
This uses the keyring-based setup instead of piping a remote installation script directly into a root shell.
Verify Node.js
Check both Node.js and npm using the following command:
node -vnode -v should show a v22 version.
$ node -v
v22.23.2
3. Install and Configure Ghost
With Nginx, MySQL, and Node.js ready, we can now install Ghost on the server.
We will use Ghost-CLI to install Ghost, configure the required services, set up HTTPS, and verify that everything is running correctly.
Install Ghost-CLI and Prepare the Directory
Ghost-CLI is the tool you will use to install and manage Ghost. It takes care of things like the Nginx configuration, SSL, systemd service, updates, and rollbacks.
First, install Ghost-CLI and create the Ghost directory:
sudo npm install ghost-cli@latest -g

sudo mkdir -p /var/www/ghost
sudo chown  ghostadmin: ghostadmin /var/www/ghost
sudo chmod 775 /var/www/ghost

cd /var/www/ghost
The directory should be empty and owned by your ghost user. Ghost-CLI checks this before starting the installation.
Verify the Setup
Use the following command to verify the permissions of the directory.
ls -la /var/www/ghost
pwd
You should see the Ghost-CLI version, an empty /var/www/ghost directory owned by ghostadmin
drwxrwxr-x  6 ghostadmin ghostadmin 4096 Aug 19 10:10 ghost
/var/www/ghost
Run the Installer
This is the main installation step. Ghost-CLI will download Ghost, connect it to MySQL, configure Nginx and SSL, and create the systemd service.
ghost installGhost-CLI will ask you several questions. Use these answers:
| Prompt | Answer |
|---|---|
| Blog URL | https://yourdomain.com |
| MySQL hostname | localhost |
| MySQL username | root |
| MySQL password | The MySQL root password |
| Ghost database name | Press Enter for the default |
| Set up MySQL user? | y |
| Set up Nginx? | y |
| Set up SSL? | y |
| Email for SSL | An email address you check |
| Set up systemd? | y |
| Start Ghost? | y |
Enter the blog URL with https://, even though the SSL certificate hasn't been created yet.
This is the URL Ghost will use for your site, so make sure it is correct. A wrong URL can cause redirect problems and make the admin panel difficult to access.
It's also better to avoid using a separate admin domain unless you know you'll keep it permanently. If that hostname changes later, Ghost may keep redirecting you to the old address.
Set Up SSL
You don't need to configure SSL manually. Ghost-CLI uses acme.sh to request a Let's Encrypt certificate and set up automatic renewal.
For this to work, your domain must already point to the server, and port 80 must be reachable from the internet.
Once the installer finishes, check Ghost:
ghost ls
ghost doctor
Ghost should show a running status, and the doctor checks should pass, as shown below.
$ ghost ls

Love open source? We’re hiring JavaScript Engineers to work on Ghost full-time.
https://careers.ghost.org


+ sudo systemctl is-active ghost_ghost-devopsproject-dev
┌─────────────────────────┬────────────────┬─────────┬──────────────────────┬─────────────────────────────────┬──────┬─────────────────┐
│ Name                    │ Location       │ Version │ Status               │ URL                             │ Port │ Process Manager │
├─────────────────────────┼────────────────┼─────────┼──────────────────────┼─────────────────────────────────┼──────┼─────────────────┤
│ ghost-devopsproject-dev │ /var/www/ghost │ 6.58.0  │ running (production) │ https://ghost.devopsproject.dev │ 2368 │ systemd         │
└─────────────────────────┴────────────────┴─────────┴──────────────────────┴─────────────────────────────────┴──────┴─────────────────┘
Then test the site from the server:
curl -I https://yourdomain.comYou should get a successful HTTP response and a valid TLS certificate.
Also check that HTTP redirects to HTTPS:
curl -I http://yourdomain.comYou should see a 301 redirect to the HTTPS URL.
Finally, open https://yourdomain.com in your browser. Your Ghost site should now open securely with HTTPS.
4. Configure Ghost After Installation
The first account you create becomes the site owner. Keep this account secure and use an email address you expect to keep for a long time.
Once you're inside Ghost Admin, you can invite other team members from Settings. Staff and give each person only the role they need.
Configure Email Delivery
Ghost uses an external SMTP provider to send email. There are two separate email features to keep in mind:
- Transactional email: password resets, staff invites, and member login links. This is configured in
config.production.json. - Newsletter email: bulk emails sent to your members. This is configured in Ghost Admin and uses Mailgun.
Before configuring email, verify your sending domain with your email provider. This usually means adding the required SPF and DKIM records to your DNS. We use the AWS SES service.
Configure SMTP with Amazon SES
Open the Ghost configuration file:
cd /var/www/ghost
vi config.production.json
Find the existing mail section and update it with your SMTP details:
"mail": {
  "from": "'DevOps Project' <noreply@devopsproject.dev>",
  "transport": "SMTP",
  "options": {
    "host": "email-smtp.us-east-1.amazonaws.com",
    "port": 2587,
    "secure": false,
    "auth": {
      "user": "YOUR-SES-SMTP-USERNAME",
      "pass": "YOUR-SES-SMTP-PASSWORD"
    }
  }
}
Port 587 with "secure": false uses STARTTLS. If you use port 465, the configuration is different and uses "secure": true.
Make sure the from address belongs to your verified domain.
Before restarting Ghost, validate the JSON:
cat config.production.json | jq .If the JSON is valid, restart Ghost:
ghost restartYou can then test email by going to Settings then clicking Staff and clicking Invite people and sending an invitation to another address you control.
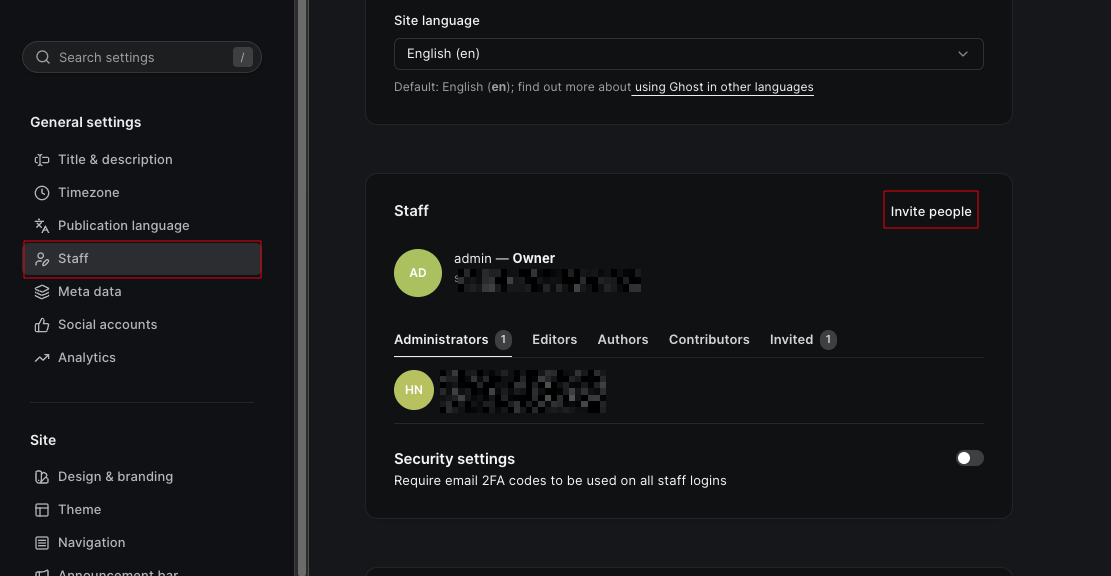
If the email doesn't arrive, check the Ghost error log:
ghost log --errorCheck the error log carefully. If you see direct-transportGhost is not using your SMTP settings and has fallen back to direct email delivery.
This can look like an email provider problem, but the issue is usually invalid config.production.json JSON or the mail configuration is in the wrong place.
Troubleshoot Common Ghost Issues
This section covers the most common problems you may encounter and shows you how to quickly identify and resolve them.
Fixing a 502 Bad Gateway
If Nginx is running but you see a 502 Bad Gateway, the problem is usually with Ghost itself. Start by checking the Ghost status and error logs:
ghost ls
ghost log --error
sudo systemctl status mysql
dmesg | grep -i kill
Common causes include MySQL being down, invalid JSON in config.production.jsonor the Node.js process running out of memory. The swap file helps reduce the chance of Ghost being killed during short memory spikes.
Fixing Ghost-CLI Permission Issues
Ghost-CLI expects the Ghost directory to be empty and owned by your non-root user. Check the directory:
ls -la /var/www/ghostIf the ownership is wrong, fix it with:
sudo chown -R ghostadmin:ghostadmin /var/www/ghost
sudo chmod 775 /var/www/ghost
If an installation failed halfway through, don't simply delete the directory. Ghost may have already created an Nginx configuration, systemd service, or database.
Instead, from the Ghost directory, run:
ghost uninstallIf the installation was only interrupted, for example, because your SSH connection dropped, try:
ghost setupThis can continue the setup instead of starting from scratch.
Debugging MySQL Connection Problems
First, check that MySQL is running:
sudo systemctl status mysql
mysql -u root -p -e "SELECT VERSION();"
If the second command works only with sudo, MySQL root is probably still using socket authentication. Go back to the MySQL setup step and configure password authentication.
If MySQL isn't starting, check its error log:
sudo tail -50 /var/log/mysql/error.logLow disk space and low memory are common things to check first.
Fixing Node.js Version Problems
Check the installed version:
node -vFor this setup, it should show v22.
If the wrong version is installed, remove it:
sudo apt remove -y nodejs
sudo apt autoremove -y
Then install Node.js 22 again using the NodeSource steps from earlier.
For a production Ghost installation, avoid using nvm. Ghost's systemd service expects a stable Node.js installation, while nvm is designed around per-user Node.js versions.
Fixing Redirect Loops
If Ghost keeps redirecting you to the wrong URL, first test the site in an incognito/private browser window.
Browsers can cache permanent 301 redirects, which can make an old URL appear to be a server problem.
If the redirect is actually coming from Ghost, update the URL through Ghost-CLI:
ghost config url https://devopsproject.dev
ghost setup nginx ssl
ghost restart
This is safer than manually editing the Ghost or Nginx configuration.
Conclusion
By now, you should have a fully working self-hosted Ghost blog running on Ubuntu with Nginx, MySQL, Node.js, HTTPS, and email configured.
The setup also gives you a good understanding of what happens behind the scenes, from DNS and Nginx to Ghost, MySQL, SSL, and systemd.
Self-hosting Ghost gives you full control over your server and data, but it also means you're responsible for updates, security, and troubleshooting.