🚀 Deploying a Machine Learning Model with Flask and MLflow
Let's learn the deploying a machine learning model using Flask as both the frontend and backend, and leveraging MLflow to manage the model and preprocessing artifacts. This setup allows for a lightweight, reproducible ML deployment environment.
If you see the project structure, it is divided into backend and frontend folder for understanding.
- Frontend and Backend:
flask - Model training:
python,mlflow
🧰 Setup MLflow Locally
Create project folder of your choice, then go that directory
mkdir mlflow_example
cd mlflow_example- Install MLflow
You will need Python, MLflow and other libraries. Open your terminal and run the below code.
pip install mlflow scikit-learn pandasOr you can clone the project and run pip install -r requirements.txt
- Start the MLflow tracking server
Let data scientist create mlflow tracking server by writing code in backend/train.py folder
# backend/train.py

import mlflow

mlflow.set_tracking_uri('http://127.0.0.1:5000')
mlflow.set_experiment('employee_attrition_classification')

with mlflow.start_run(run_name = "employee_attrition_run) as run:
  ....
  ....
  ....
train.py run this command:
mlflow server --backend-store-uri sqlite:///mlflow.db --default-artifact-root ./mlruns --host 127.0.0.1 --port 5000This sets up a local MLflow server. Think of it as a dashboard for your ML work. Here you are calling mlflow server and setting up sqlite databasebackend-store-uri sqlite:///mlfow.db and storing model artifacts in ./mlruns folder. Then setting up your port to run at localhost:5000
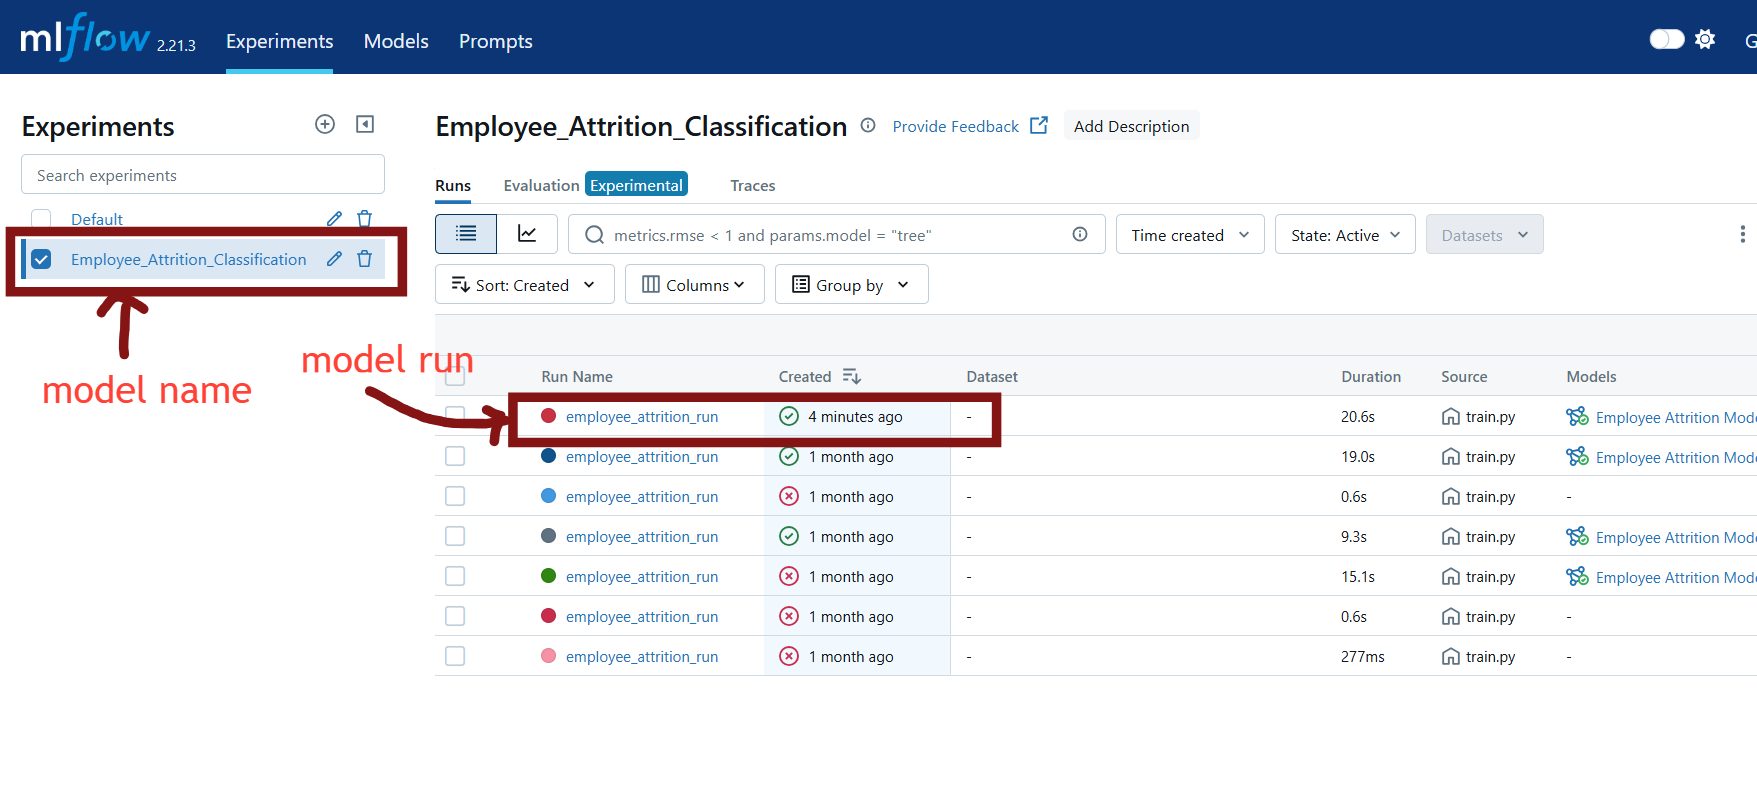
- Open your browser and go to
http://127.0.0.1:5000/you will see mlflow interface where you can view experiments and models
⚙️ Model Setup
Employee attrition classification is used to predict whether employee stays or leave the company. Here we are using supervised logistic regression model to classify two classes that is 'stay' or 'left'.
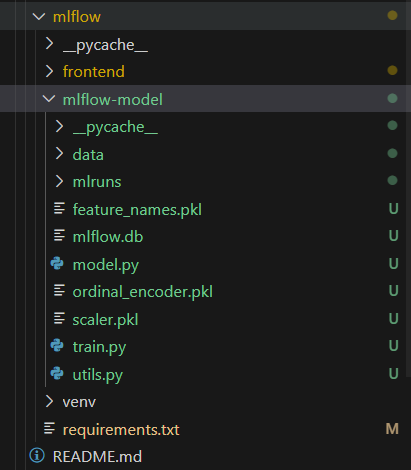
A. mlflow-model/train.py
So let's go to project directory and create train.py file to train our model.
- Install dependencies
import mlflow
import mlflow.sklearn
from mlflow.models import infer_signature
import pandas as pd
import pickle
from utils import load_emp_attr_data
from model import train_model
from sklearn.preprocessing import StandardScaler- Continue with MLflow tracking server from above
This is to track the model in MLflow Interface, we can also save model artifacts and log the metrics.
mlflow.set_tracking_uri('http://127.0.0.1:5000')
mlflow.set_experiment('employee_attrition_classification')

with mlflow.start_run(run_name='employee_attrition_run') as run:
  X_train, X_test, y_train, y_test, ordinal_encoder = load_data()

  # save column names for later use
  column_names = X_train.columns.tolist()

  # normalize the dataset
  scaler = StandardScaler()
  X_train_scaled = scaler.fit_transform(X_train)
  X_test_Scaled = scaler.transform(X_test)

  # call model => model.py
  model, accuracy = train_model(X_train_scaled, X_test_scaled, y_train, y_test)

  # now log accuracy score in mlflow
  mlflow.log_metric('accuracy', accuracy * 100)
  signature = infer_signature(X_train_scaled, model.predict(X_train_scaled))
Here, infer-signature is to determine model-artifact input, output. Input means X_train and our output should be prediction model i.e., model.predict(X_train)
- Save model Artifacts
  .... continue above code
  #save model artifact
  with open('scaler.pkl', 'wb') as f:
    pickle.dump(scaler, f)
  mlflow.log_artifact('scaler.pkl', artifact_path='preprocessor')

  # save feature/column nmaes in artifact
  with open('feature_names', 'wb') as f:
    pickle.dump(column_names, f)
  mlflow.log_artifact('feature_names.pkl', artifact_path='preprocessor')

  # save ordinal-encoder in artifact
  with open('ordinal_encoder', 'wb') as f:
    pickle.dump(ordinal_encoder, f)
  mlflow.log_artifact('ordinal_encoder.pkl', artifact_path='preprocessor')
- Create custom model by configuring model information
  ... continue above code
  model_info = mlflow.sklearn.log_mode(
    sk_model = model,
    artifact_path = 'employee_attrition_model',
    signature = signature,
    input_example = X_train_scaled,
    registered_model_name = 'Employee Attrition Model'
  )

  print(f'Registered Model Name: {model_info.model_uri}')
  print(f'Run ID: {run.info.run_id}')
  print(f'Model Accuracy: {accuracy}')
  print(f'Model registered as: {model_info.model_name}')

  # end of mlflow run()
B. mlflow-model/model.py
Create logistic regression model in model.py file
# model.py file
from sklearn.linear_model import LogisticRegression
from sklearn.metrics import accuracy_Score
In metrics we are using accuracy_score to determine the accuracy of our model.
# model.py
...

def train_model(X_train, X_test, y_train, y_test):
  lr = LogisticRegression(random_state = 42)
  lr.fit(X_train, y_train)

  y_pred = lr.predict(X_test)

  accuracy = accuracy_score(y_pred, y_test)
  return lr, accuracy
The following Python script integrates MLflow to track the training process of an employee attrition classification model.
C. mlflow-model/utils.py
To load the train and test dataset
import pandas as pd
from sklearn.preprocessing import OrdinalEncoder
from sklearn.model_selection import train_test_split
from pathlib import Path

BASE_PATH = Path(__file__).parent
TRAIN_DATA_PATH = BASE_PATH / 'data' / 'train.csv'
TEST_DATA_PATH = BASE_PATH / 'data' / 'test.csv'

def load_data():
  trian_dataset = pd.read_csv(TRAIN_DATA_PATH)
  test_dataset = pd.read_csv(TEST_DATA_PATH)
  dataset = pd.concat([train_Dataset, test_dataset])

  X = dataset.drop(['Employee ID', 'Attrition', 'Job Role', 'Distance from Home', 'Marital Status', 'Gender'], axis=1)

  y = dataset['Attrition']
- Preprocess the data: For this we are using ordinal encoder, which is used to transform categorical data into numerical values, specifically when the categorical variable has an inherent order or ranking.
  ..... continue from above code

  # pre-processing the dataset
  columns_to_encode = ['Work-Life Balance', 'Job Satisfaction', 'Performance Rating', 'Education Level', 'Job Level', 'Company Size', 'Company Reputation', 'Employee Recognition']

  categories = [
        ['Poor', 'Fair', 'Good', 'Excellent'], # Work-Life Balance
        ['Low', 'Medium', 'High', 'Very High'], # Job Satisfaction
        ['Low', 'Below Average', 'Average', 'High'], # Performance Rating
        ["High School", "Bachelor’s Degree", "Master’s Degree", "Associate Degree", "PhD"], # Education Level
        ['Entry', 'Mid', 'Senior'], # Job Level
        ['Small', 'Medium', 'Large'], # Company Size
        ['Poor', 'Fair', 'Good', 'Excellent'], # Company Reputation
        ['Low', 'Medium', 'High', 'Very High'], # Employee Recognition
    ]
    oe = OrdinalEncoder(categories=categories)
X[columns_to_encode] = oe.fit_transform(X[columns_to_encode]).astype('int')- Binary encoding:
 ... continue above code
 # binary encoding
    binary_cols = ['Overtime', 'Remote Work', 'Leadership Opportunities', 'Innovation Opportunities']
    for col in binary_cols:
X[col] = X[col].map({'No': 0, 'Yes': 1})- Label encoding:
  ... continue above code
  # label encoding (for target or class values)
y = y.map({'Stayed': 0, 'Left': 1})- Feature Engineering
  .. continue above code
  # Feature Engg (optional)
    X['Opportunities'] = X['Leadership Opportunities'] + X['Innovation Opportunities']
    X = X.drop(columns=['Leadership Opportunities', 'Innovation Opportunities'])

    ## Feature Engg (Income Mapping)
    def map_monthly_income(income):
        if 1 <= income <= 10000:
            return 0
        elif 10001 <= income <= 20000:
            return 1
        elif 20001 <= income <= 50000:
            return 2
        elif 50001 <= income <=100000:
            return 3
        elif income >= 100001:
            return 4
        else:
            return -1
    X['Monthly Income'] = X['Monthly Income'].apply(map_monthly_income)
- Split the dataset to train and test
  ...continue above code
  x_train, x_test, y_train, y_test = train_test_split(X, y, test_size=0.2, random_state=42)

  return x_train, x_test, y_train, y_test, oe

  # end load_data() function
🔃 Running the MLflow Experiment
You have to keep MLflow running by using this command
mlflow server --backend-store-uri sqlite:///mlflow.db --default-artifact-root ./mlruns --host 127.0.0.1 --port 5000Then open new terminal, and execute the script run:
python train.pyOnce executed, open the MLflow UI by visiting http://127.0.0.1:5000. You will see:
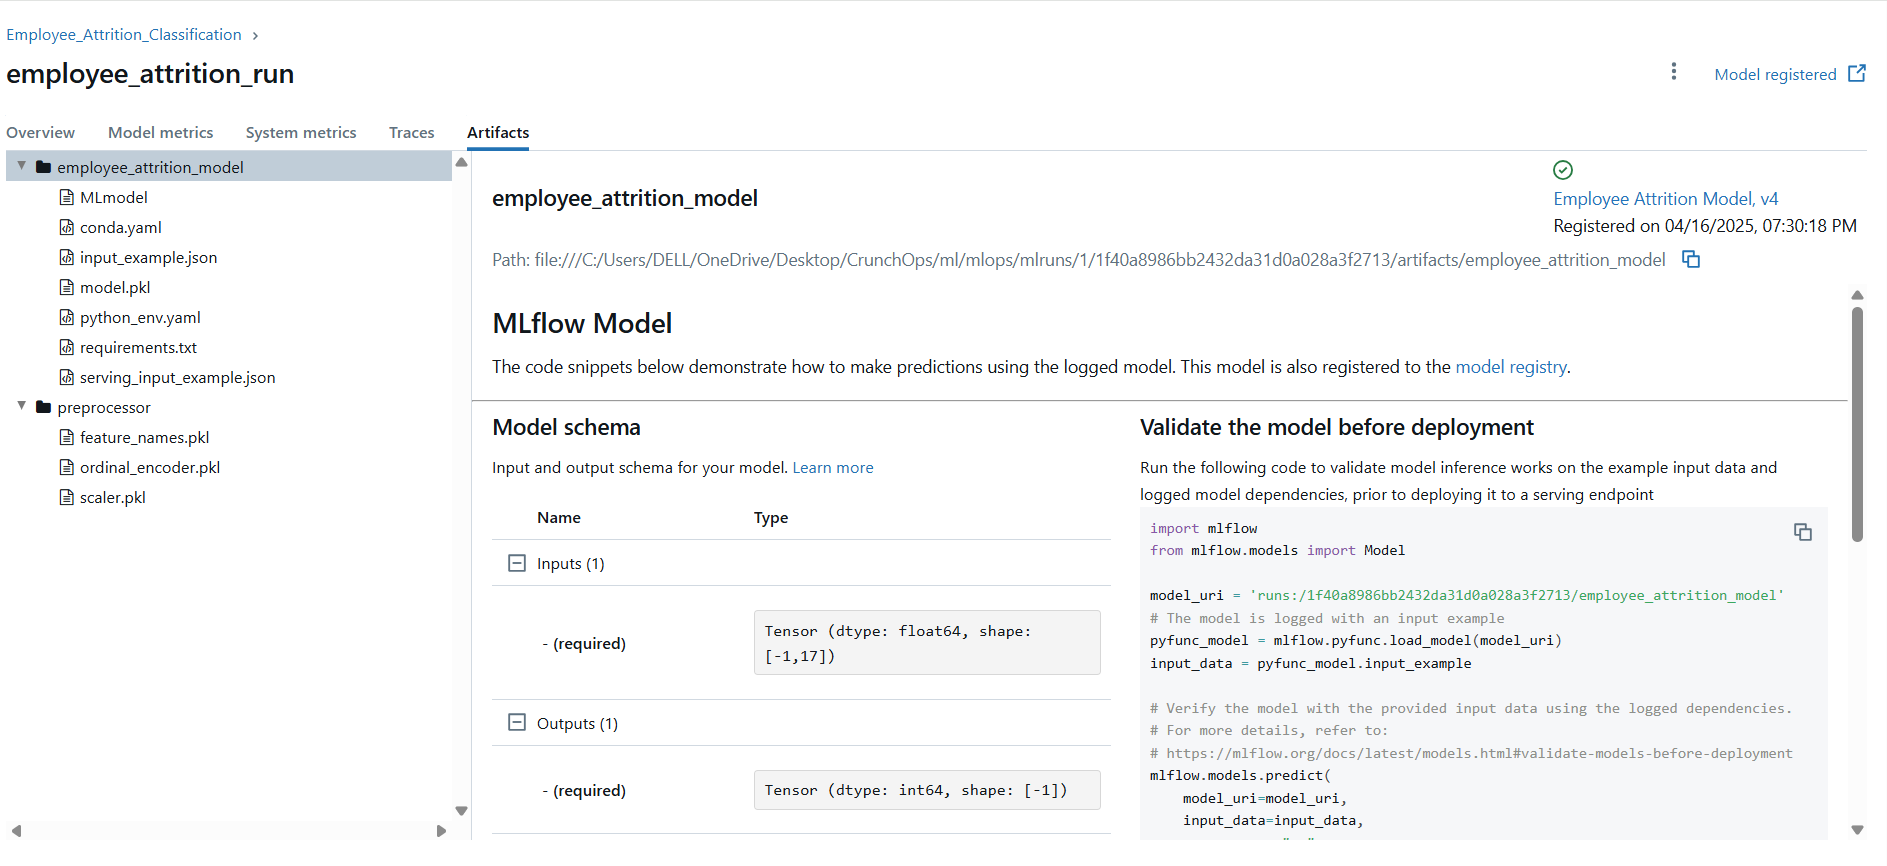
- The experiment details
- Metrics such as accuracy
- Saved artifacts including the trained model and preprocessing components
For backend resource link - click here!
💡 Bonus: Loading the Trained Model
We have to call model service from frontend UI so that backend will generate response by using the model.
Now how do we use this model ?
For this, we have to load the registered model for inference at frontend:
import mlflow.sklearn
model = mlflow.sklearn.load_model("models:/Employee Attrition Model/latest")
To understand this, follow next blog – Frontend setup of MLflow project.