UI setup of MLflow project
For frontend setup, used a flask framework to render UI and flask server as backend.
Install flask if not installed already, use command pip install flask
Folder Structure
Your project folder should look like this:
frontend/
│
|── static/
    |── script.js    # to process form data
    |── style.css
├── templates/
│   └── index.html   # Frontend UI template
│
├── app.py           # Backend Flask server
Setup Flask as Backend
First, make sure you have Flask installed. You can install it using pip:
pip install flask flask-cors pandas mlflow
or clone the project and run command pip install -r requirements.txt to install dependencies.
i. Import libraries
from flask import Flask, request, jsonify, render_template
from flask_cors import CORS
import pandas as pd
import pickle

import mlflow
import mlflow.pyfunc
ii. Create Flask app
app = Flask(__name__)
CORS(app)

@app.route('/')
def index():
    return render_template('index.html')

@app.route('/predict', methods=['POST'])
def predict():
  ... will continue

if __name__ == "__main__":
    app.run(host='127.0.0.1', port=8000, debug=True)
iii. Setup MLflow tracking and install artifacts
# mlflow
mlflow.set_tracking_uri("http://127.0.0.1:5000")

model_name = "Employee Attrition Model"
model_version = "3"
run_id = "bdda2dfd55454b9694bef6653ebbbe64"
model = mlflow.pyfunc.load_model(f"models:/{model_name}/{model_version}")

# download artifacts
scaler_path = mlflow.artifacts.download_artifacts(f"runs:/{run_id}/preprocessor/scaler.pkl")
with open(scaler_path, "rb") as f:
    scaler = pickle.load(f)

feature_names_path = mlflow.artifacts.download_artifacts(f"runs:/{run_id}/preprocessor/feature_names.pkl")
with open(feature_names_path, "rb") as f:
    feature_names = pickle.load(f)

ordinal_encoder_path = mlflow.artifacts.download_artifacts(f"runs:/{run_id}/preprocessor/ordinal_encoder.pkl")
with open(ordinal_encoder_path, "rb") as f:
    ordinal_encoder = pickle.load(f)
iv. Continue with predict()
 ... continue with predict() as mentioned in step-2

@app.route('/predict', methods=['POST'])
def predict():
    data = request.get_json()
    if isinstance(data, dict):
        input_data = pd.DataFrame([data])
    else:
        input_data = pd.DataFrame(data)
    print('data', input_data)

    df = preprocessing_input(input_data)
    print('df: ', df)

    try:
        prediction = model.predict(df)
        print('predict: ', prediction)

        result = "Left" if prediction[0] == 1 else "Stayed"
        print('result: ', result)
        return jsonify({"prediction": result})
    except Exception as e:
        return jsonify({
            "error": str(e)
        }), 400
Here, we get json_data from frontend, and check if its compatible with dataframe, if not we'll create one.
Then we'll preprocess the input data by calling preprocessing_input() function which we'll see next.
Lastly predict the input with model, here model is the one we load using mlflow model = mlflow.pyfunc.load_model(f"models:/{model_name}/{model_version}")
v. Preprocessing function
def preprocessing_input(input):
    # ordinal encoding
    cols_to_encode = ['Work-Life Balance', 'Job Satisfaction', 'Performance Rating', 'Education Level', 'Job Level', 'Company Size', 'Company Reputation', 'Employee Recognition']
    input[cols_to_encode] = ordinal_encoder.transform(input[cols_to_encode]).astype('int')

    # binary encoding
    binary_cols = ['Overtime', 'Remote Work', 'Opportunities']
    for col in binary_cols:
        input[col] = input[col].map({'No': 0, 'Yes': 1})

    # feature engg
    def map_monthly_income(income):
        if 1 <= income <= 10000:
            return 0
        elif 10001 <= income <= 20000:
            return 1
        elif 20001 <= income <= 50000:
            return 2
        elif 50001 <= income <=100000:
            return 3
        elif income >= 100001:
            return 4
        else:
            return -1
    input['Monthly Income'] = input['Monthly Income'].apply(map_monthly_income)

    # ensure correct column order
    input = input[feature_names]
    print(input)

    # scale the data
    input_scaled = scaler.transform(input)
    return input_scaled
We have used encoding and feature engineering when training the model. So our model expects the same thing for new request data! We have to preprocess the new request data as we did in training model by following the same method.
Run the frontend code
python app.py
or you can run flask
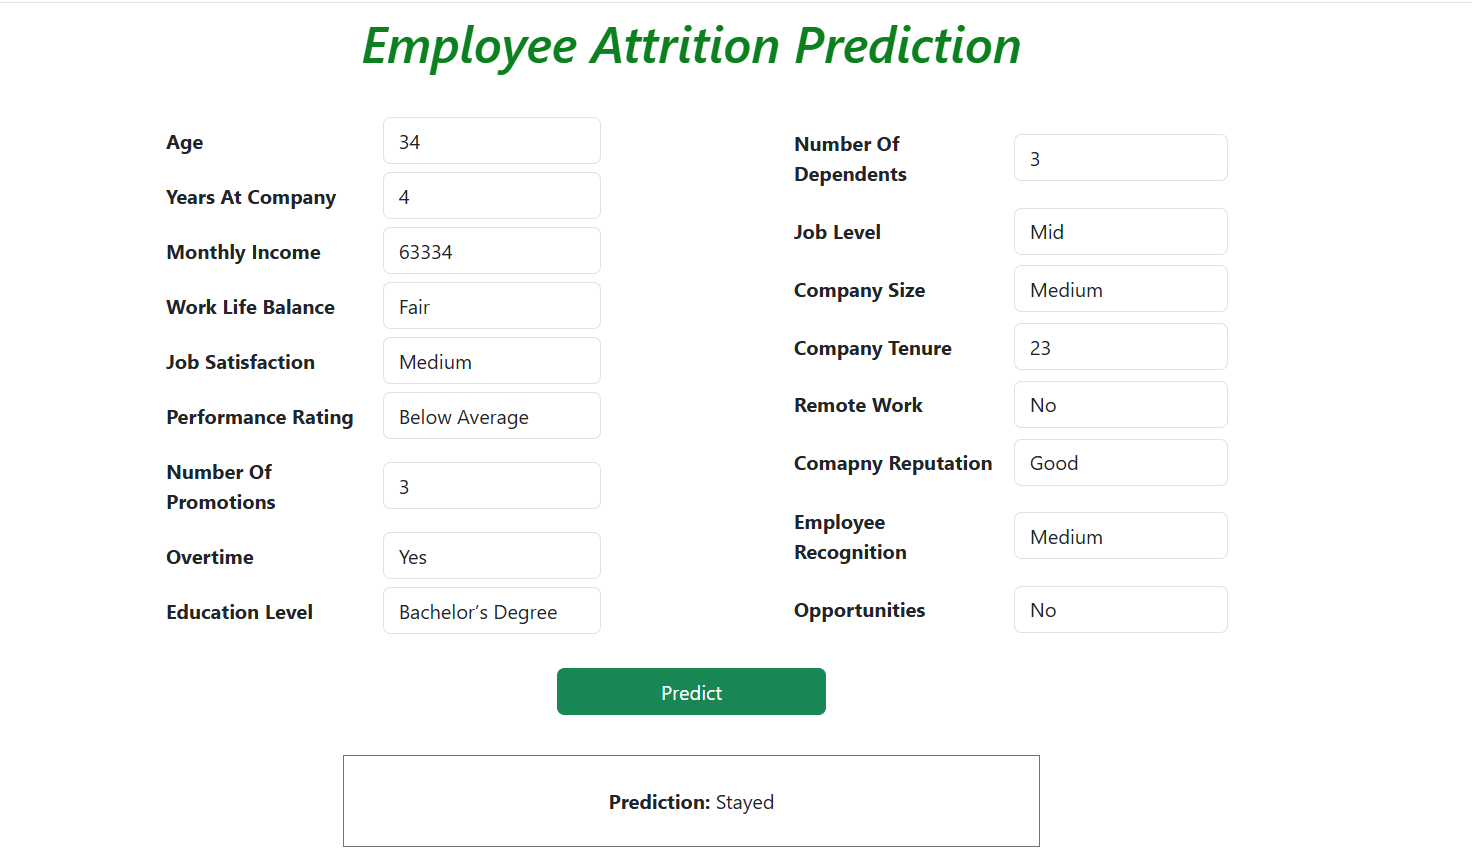
flask runBelow is the UI will render
What’s Happening Behind the Scenes?
- Frontend sends data to
/predictvia a POST request. - Backend receives JSON, converts it to a Pandas DataFrame.
- Preprocessing is applied using loaded MLflow artifacts (ordinal encoder, scaler, etc.).
- The model makes a prediction using MLflow’s
pyfuncinterface. - The response is sent back as JSON with the prediction:
StayedorLeft.
Conclusion
MLflow makes tracking models, managing artifacts, and deploying reproducible pipelines effortless. Using Flask and MLflow together provides a flexible, fast development environment for machine learning web apps.
Try using MLflow in your machine learning projects to improve your workflow and reproducibility!