How to Fix DNS Timeout Issue in Kubeadm + Calico on AWS
This scenario assumes you are setting up a self-managed Kubernetes cluster on AWS EC2 instances using kubeadm. The nodes may run in the same subnet within the same VPC.
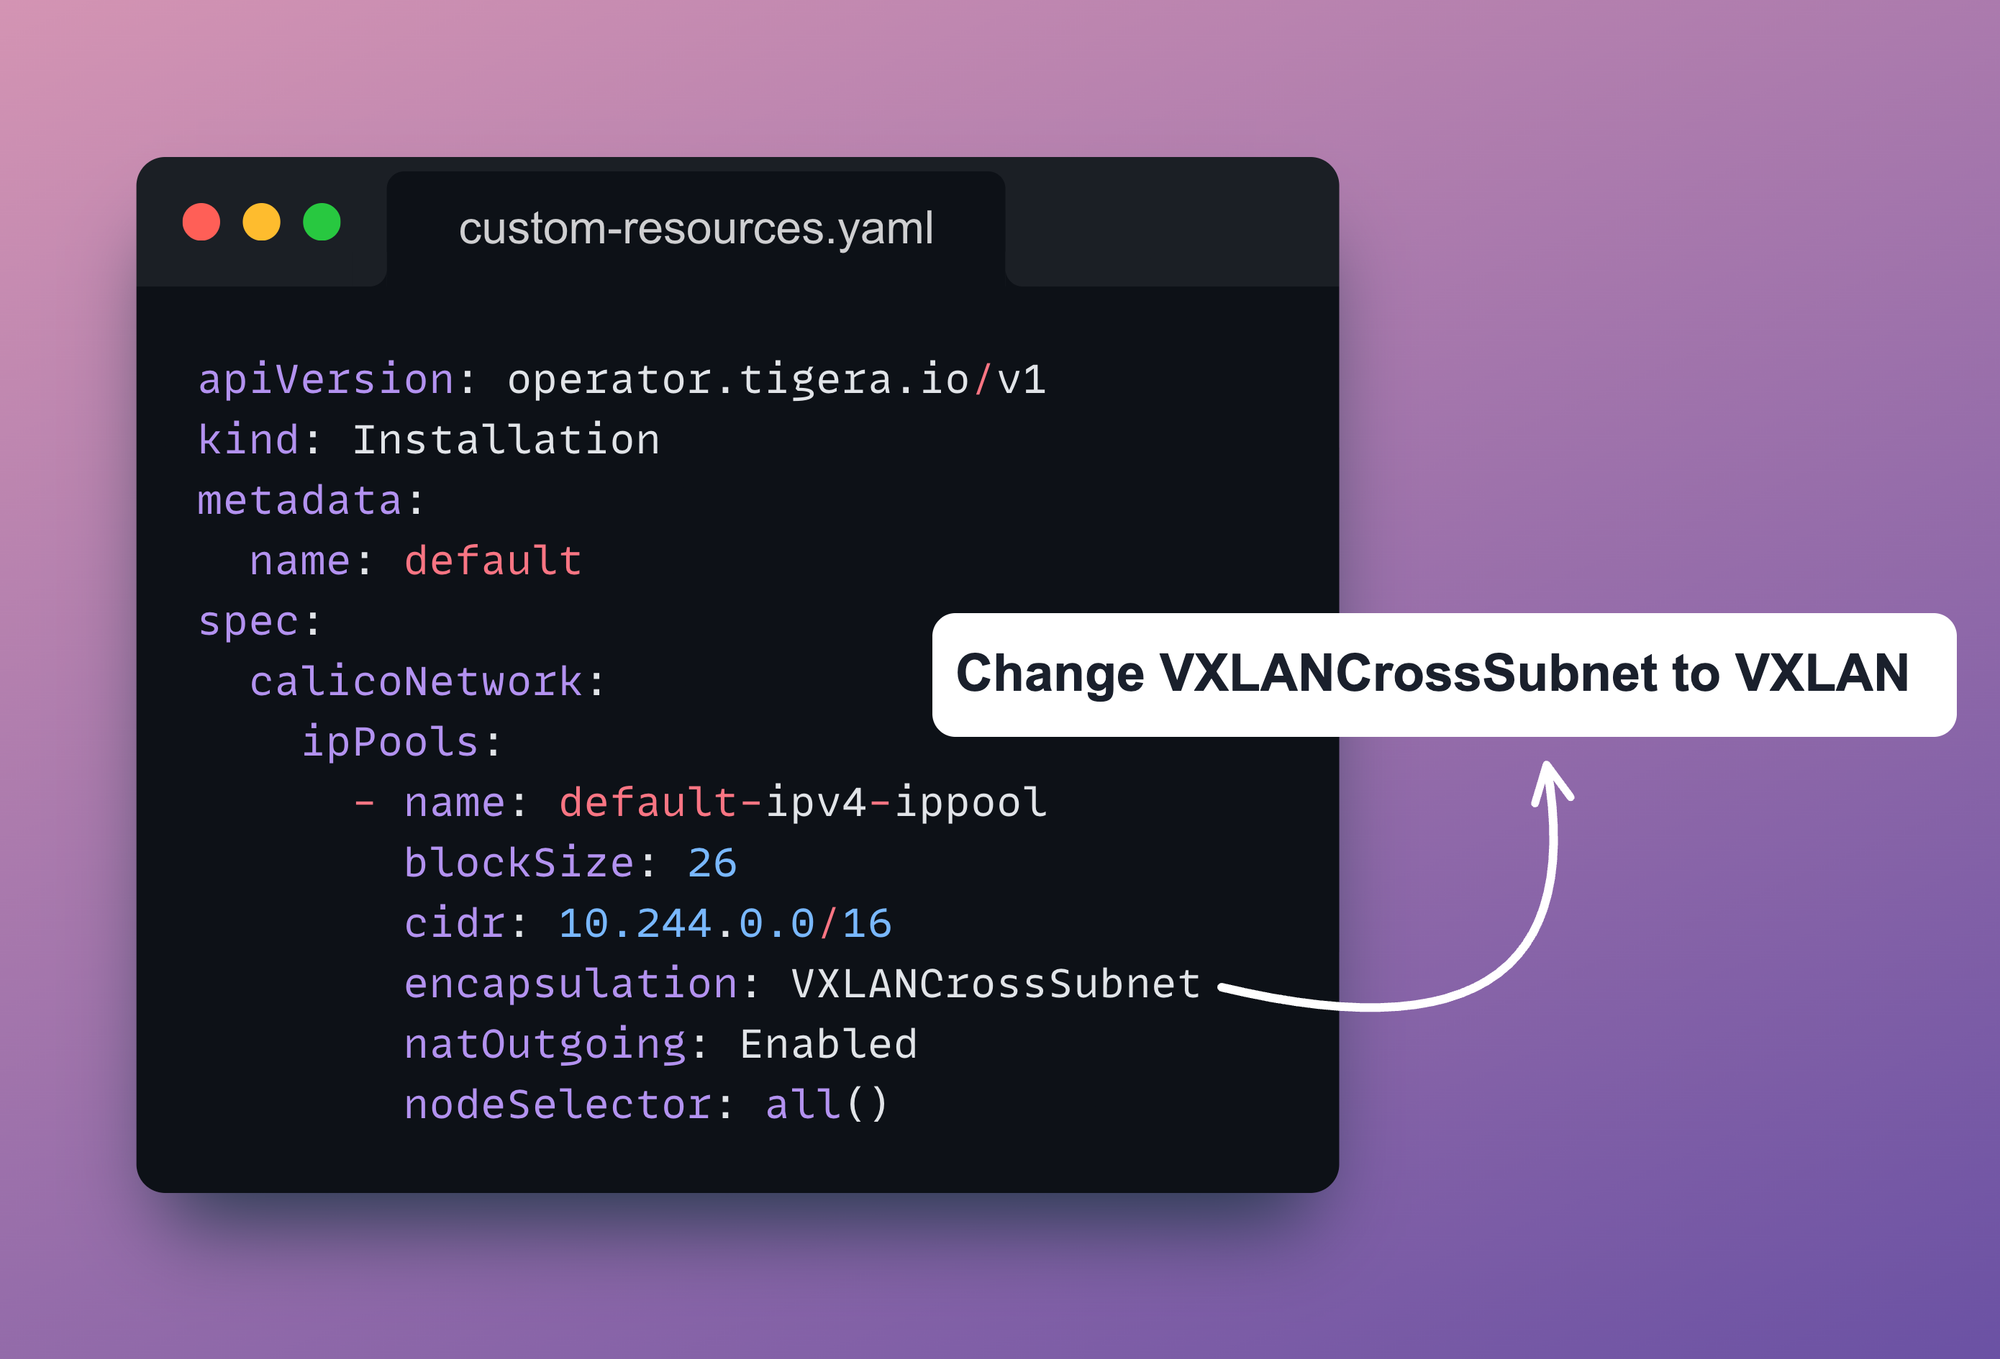
When following the standard Tigera Operator installation guide, you download the custom-resources.yaml, update the CIDR to match your cluster, and apply it.
The custom-resources.yaml configuration looks like this:
apiVersion: operator.tigera.io/v1
kind: Installation
metadata:
  name: default
spec:
  calicoNetwork:
    ipPools:
      - name: default-ipv4-ippool
        blockSize: 26
        cidr: 10.244.0.0/16
        encapsulation: VXLANCrossSubnet
        natOutgoing: Enabled
        nodeSelector: all()
Issue
You install Calico using the Tigera Operator with the standard custom-resources.yaml, updating the CIDR to match your cluster’s pod network.
When you run nslookup kubernetes.default it returns: connection timed out; no servers could be reached error as shown below.
$ kubectl exec -it dnsutils -- nslookup kubernetes.default

;; connection timed out; no servers could be reached
command terminated with exit code 1
The following image visually illustrates the issue.
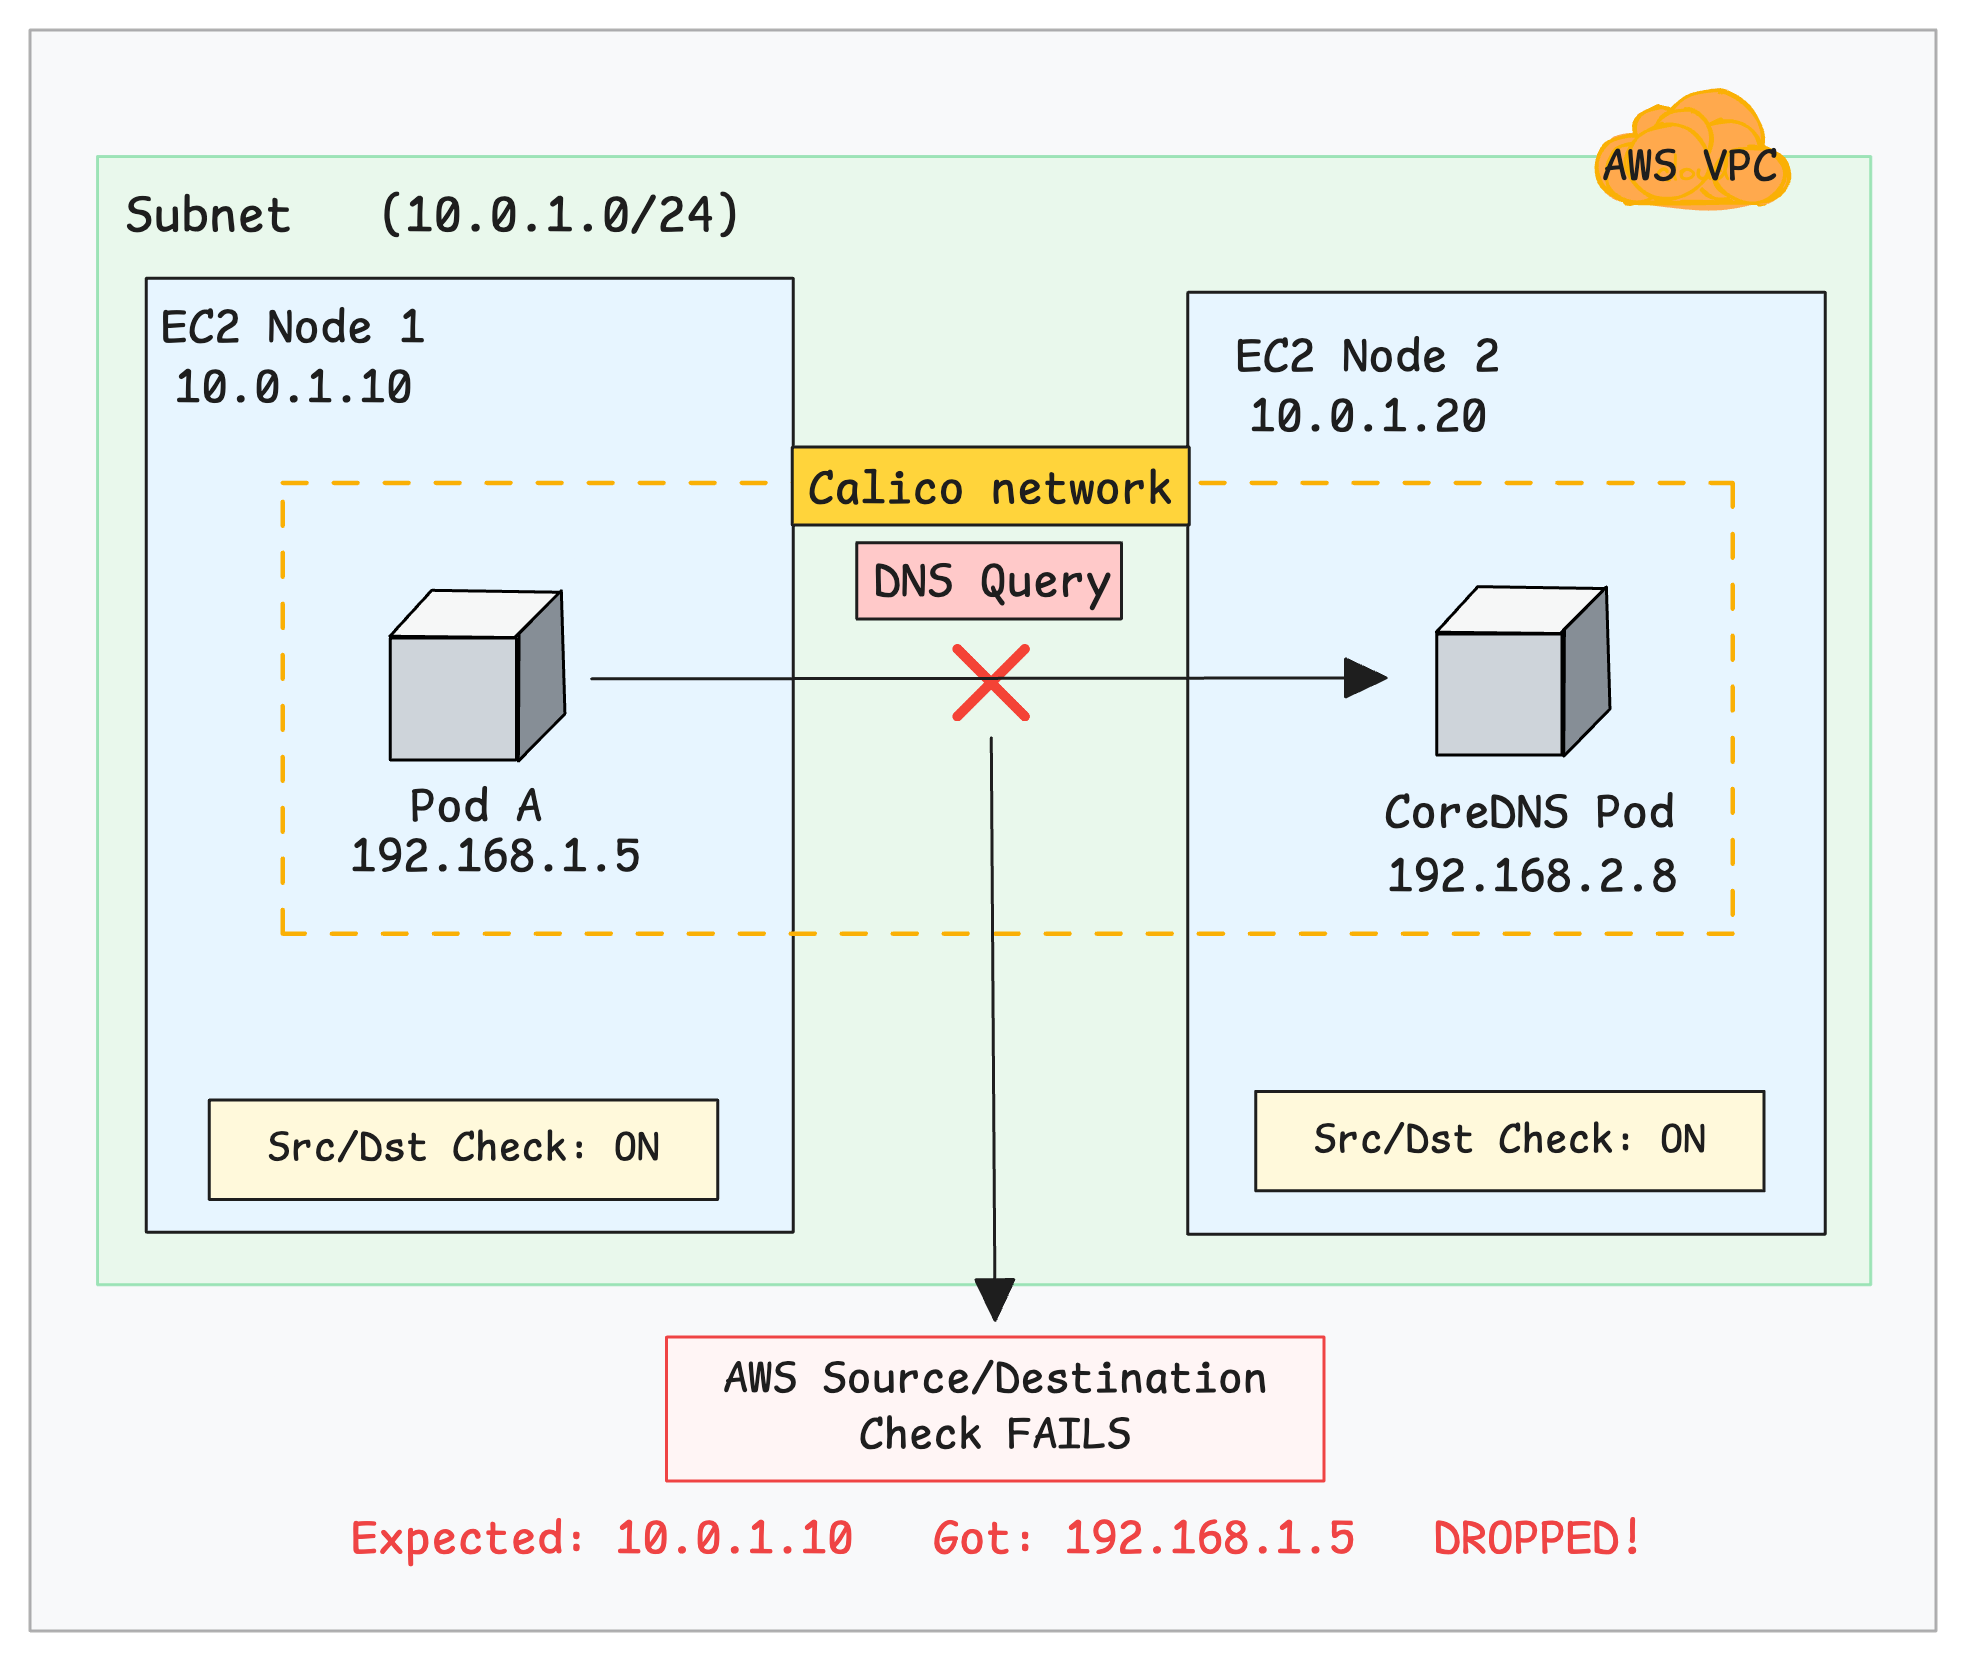
If the security group rules are correct and that the CoreDNS pods are healthy, the issue is likely caused by a misconfiguration in Calico.
How to Fix It
The second option is that you need to change the encapsulation from VXLANCrossSubnet to VXLAN. This forces Calico to always encapsulate pod traffic between nodes instead of conditionally deciding based on subnets.
With VXLAN enabled, every packet is wrapped inside a VXLAN tunnel.
The outgoing packet uses the EC2 instance IPs as the source and destination. These are valid IPs that AWS understands and can route. The pod IPs remain hidden inside the packet.
Note: For existing clusters, edit the IPPool usingkubectl edit ippool default-ipv4-ippooland setvxlanMode: Always. Also, update the configuration incustom-resources.yamlby changingVXLANCrossSubnettoVXLAN, then apply the changes.
Below is the correct IPPool manifest file:
apiVersion: operator.tigera.io/v1
kind: Installation
metadata:
  name: default
spec:
  calicoNetwork:
    ipPools:
      - name: default-ipv4-ippool
        blockSize: 26
        cidr: 10.244.0.0/16
        encapsulation: VXLAN
        natOutgoing: Enabled
        nodeSelector: all()
Verify the fix:
After applying the change, wait for the Calico pods to restart, then run:
kubectl exec -it dnsutils -- nslookup kubernetes.defaultYou should see a successful response like:
Server:         10.96.0.10
Address:        10.96.0.10

Name:   kubernetes.default.svc.cluster.local
Address: 10.96.0.1Why it Happens
In VXLANCrossSubnet mode, Calico decides whether to use encapsulation by comparing each node's IP address and subnet. It gets this information from the node’s configured IP and CIDR.
This is usually set automatically using IP autodetection or configured manually, and stored in the Calico Node resource (spec.bgp.ipv4Address).
If two nodes appear to be in the same subnet, Calico sends traffic without encapsulation. If they are in different subnets, Calico uses VXLAN encapsulation.
The problems occurs when Calico incorrectly assumes nodes are in the same subnet. It forwards packets directly without encapsulation, using the original pod IP as the source IP over the AWS network.
However, AWS does not recognize pod IPs. It only expects traffic from the instance's real IP (10.0.1.10). Because of this, the AWS Source/Destination Check treats the packet as invalid and silently drops it.
The following image illustrates the packet flow.
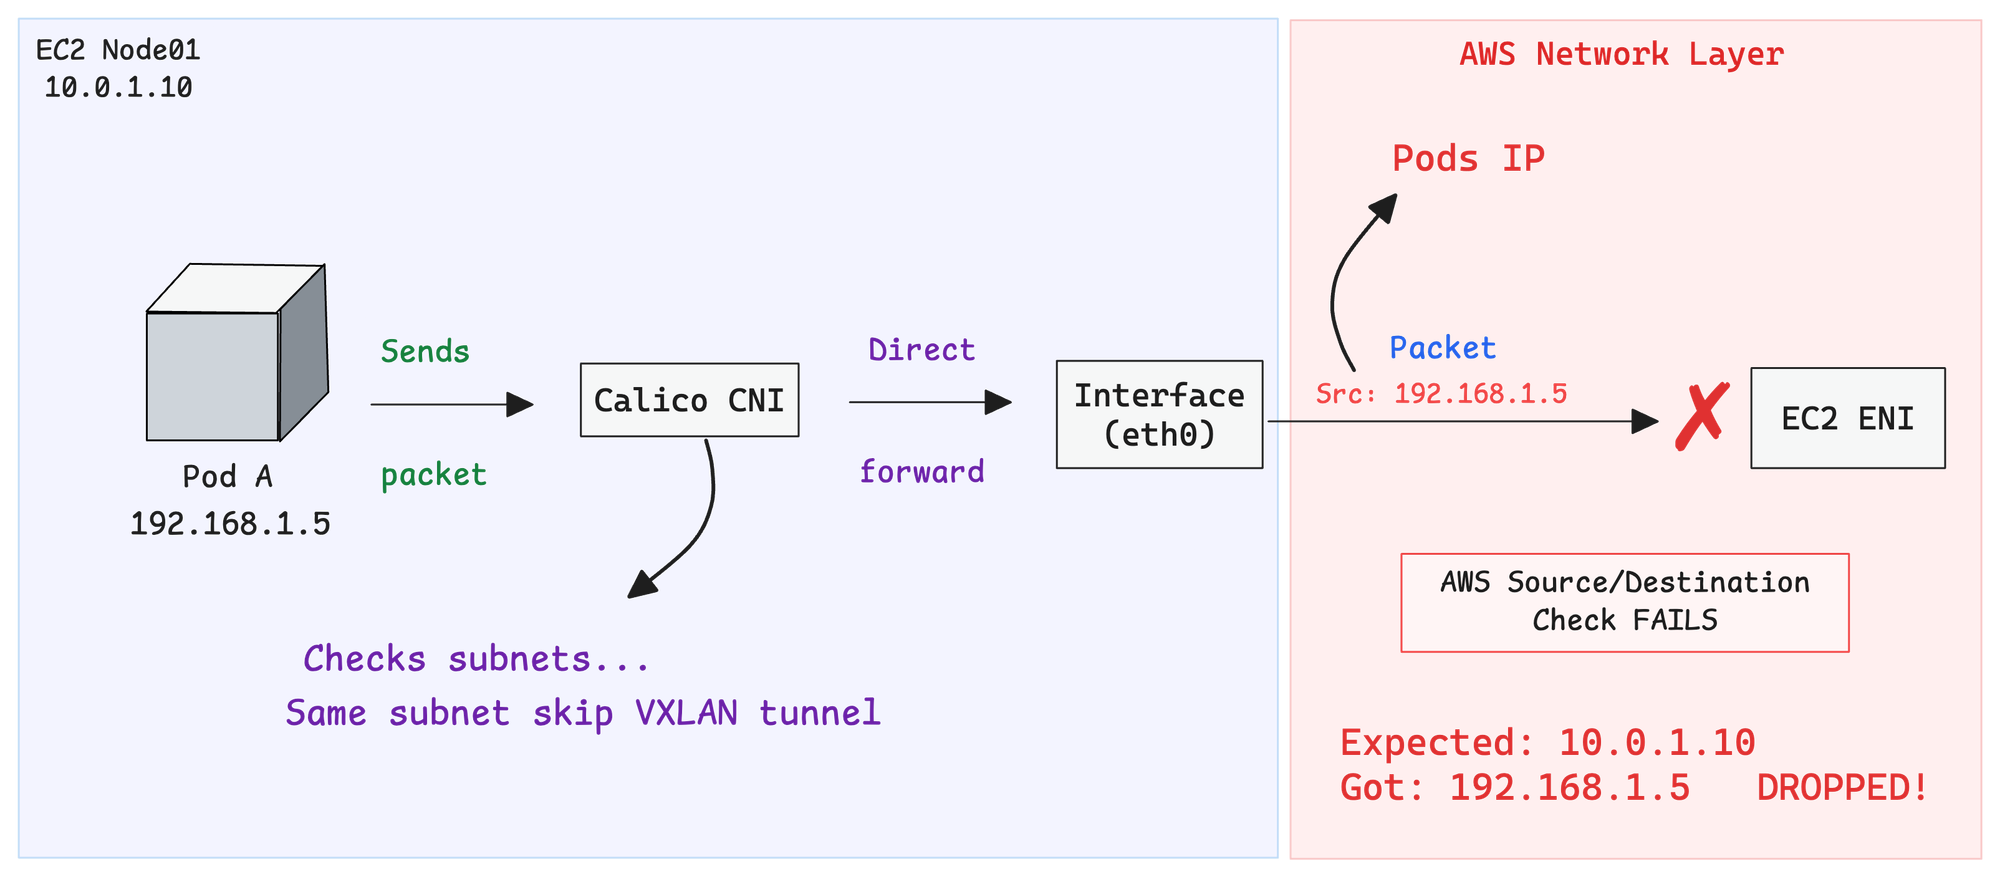
This silent drop makes the issue difficult to debug since there are no logs or explicit errors.
How VXLAN encapsulation works.
Let's dive deeper into how VXLAN encapsulation works.
Use the following image reference to understand the explanation given below.
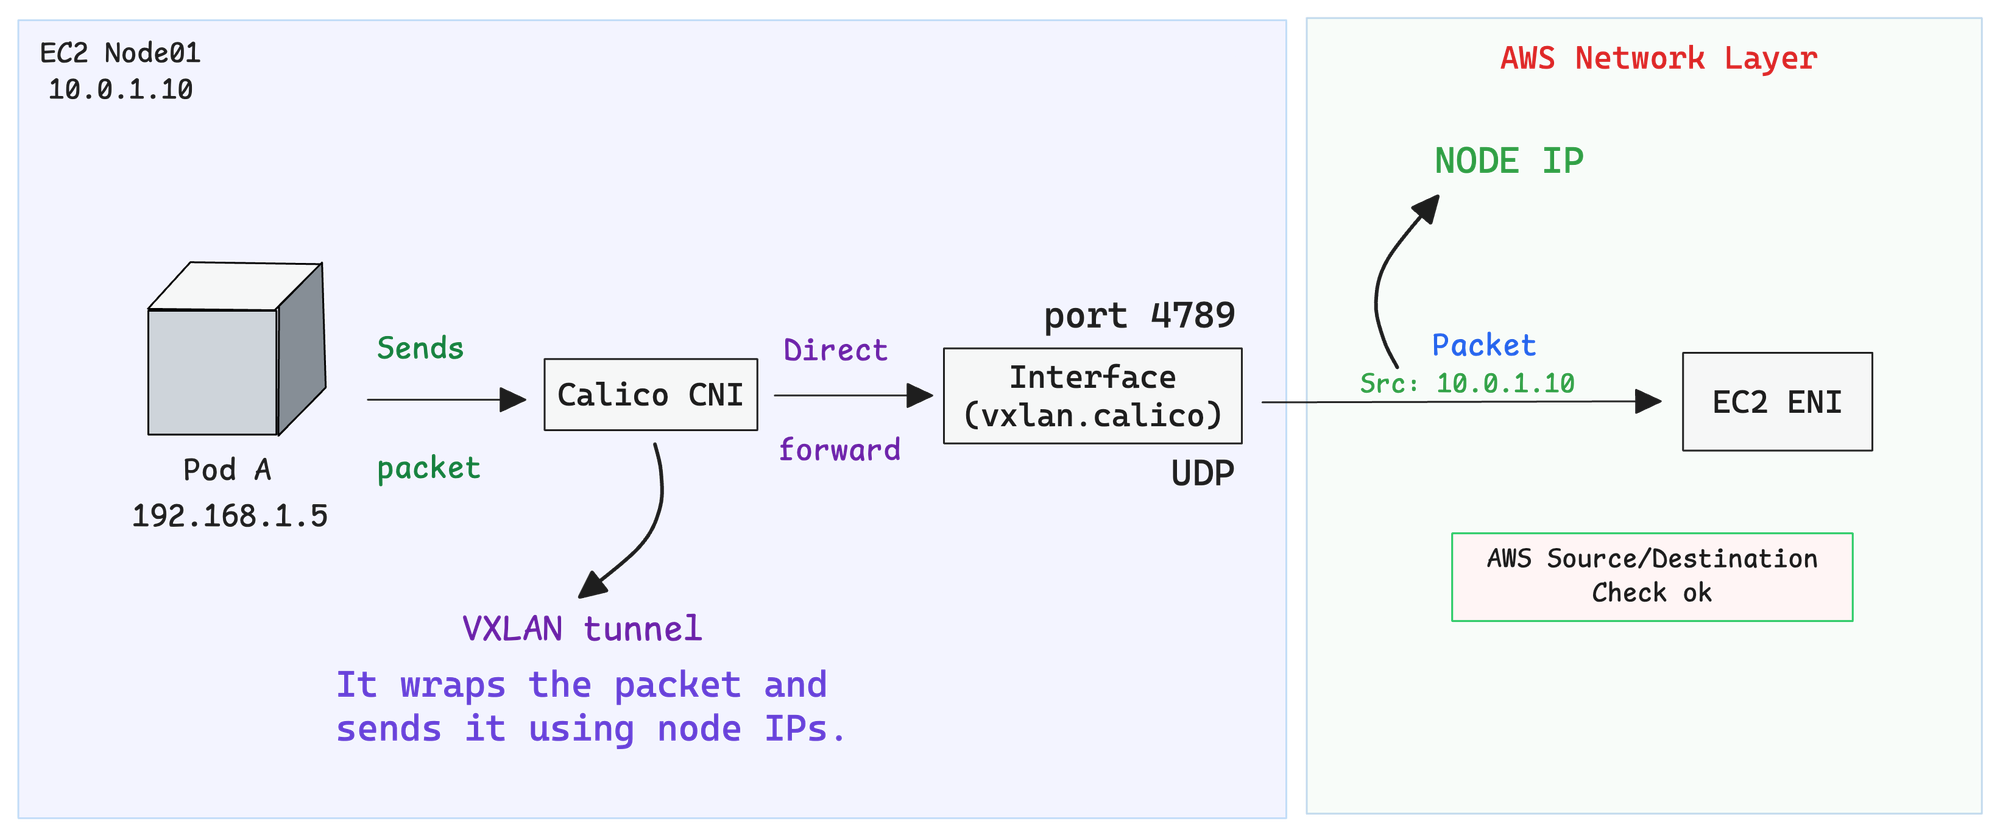
So the kernel sends the packet to a special interface called vxlan.calico. Think of this interface as a packaging machine.
It takes the original packet, puts it inside a bigger packet, and writes the node IPs on the outside using UDP port 4789. Now AWS sees traffic going from Node01 to Node02, something it knows how to handle.
The packet travels through the AWS network just like any normal traffic between two EC2 instances. AWS has no idea there's a hidden pod packet inside.
When the packet arrives at Node02, the vxlan.calico interface on that side opens the package, pulls out the original packet, and hands it over to the CoreDNS pod. From CoreDNS's perspective, the packet simply arrives from Pod A
It has no idea about the VXLAN encapsulation and decapsulation that happened in between.
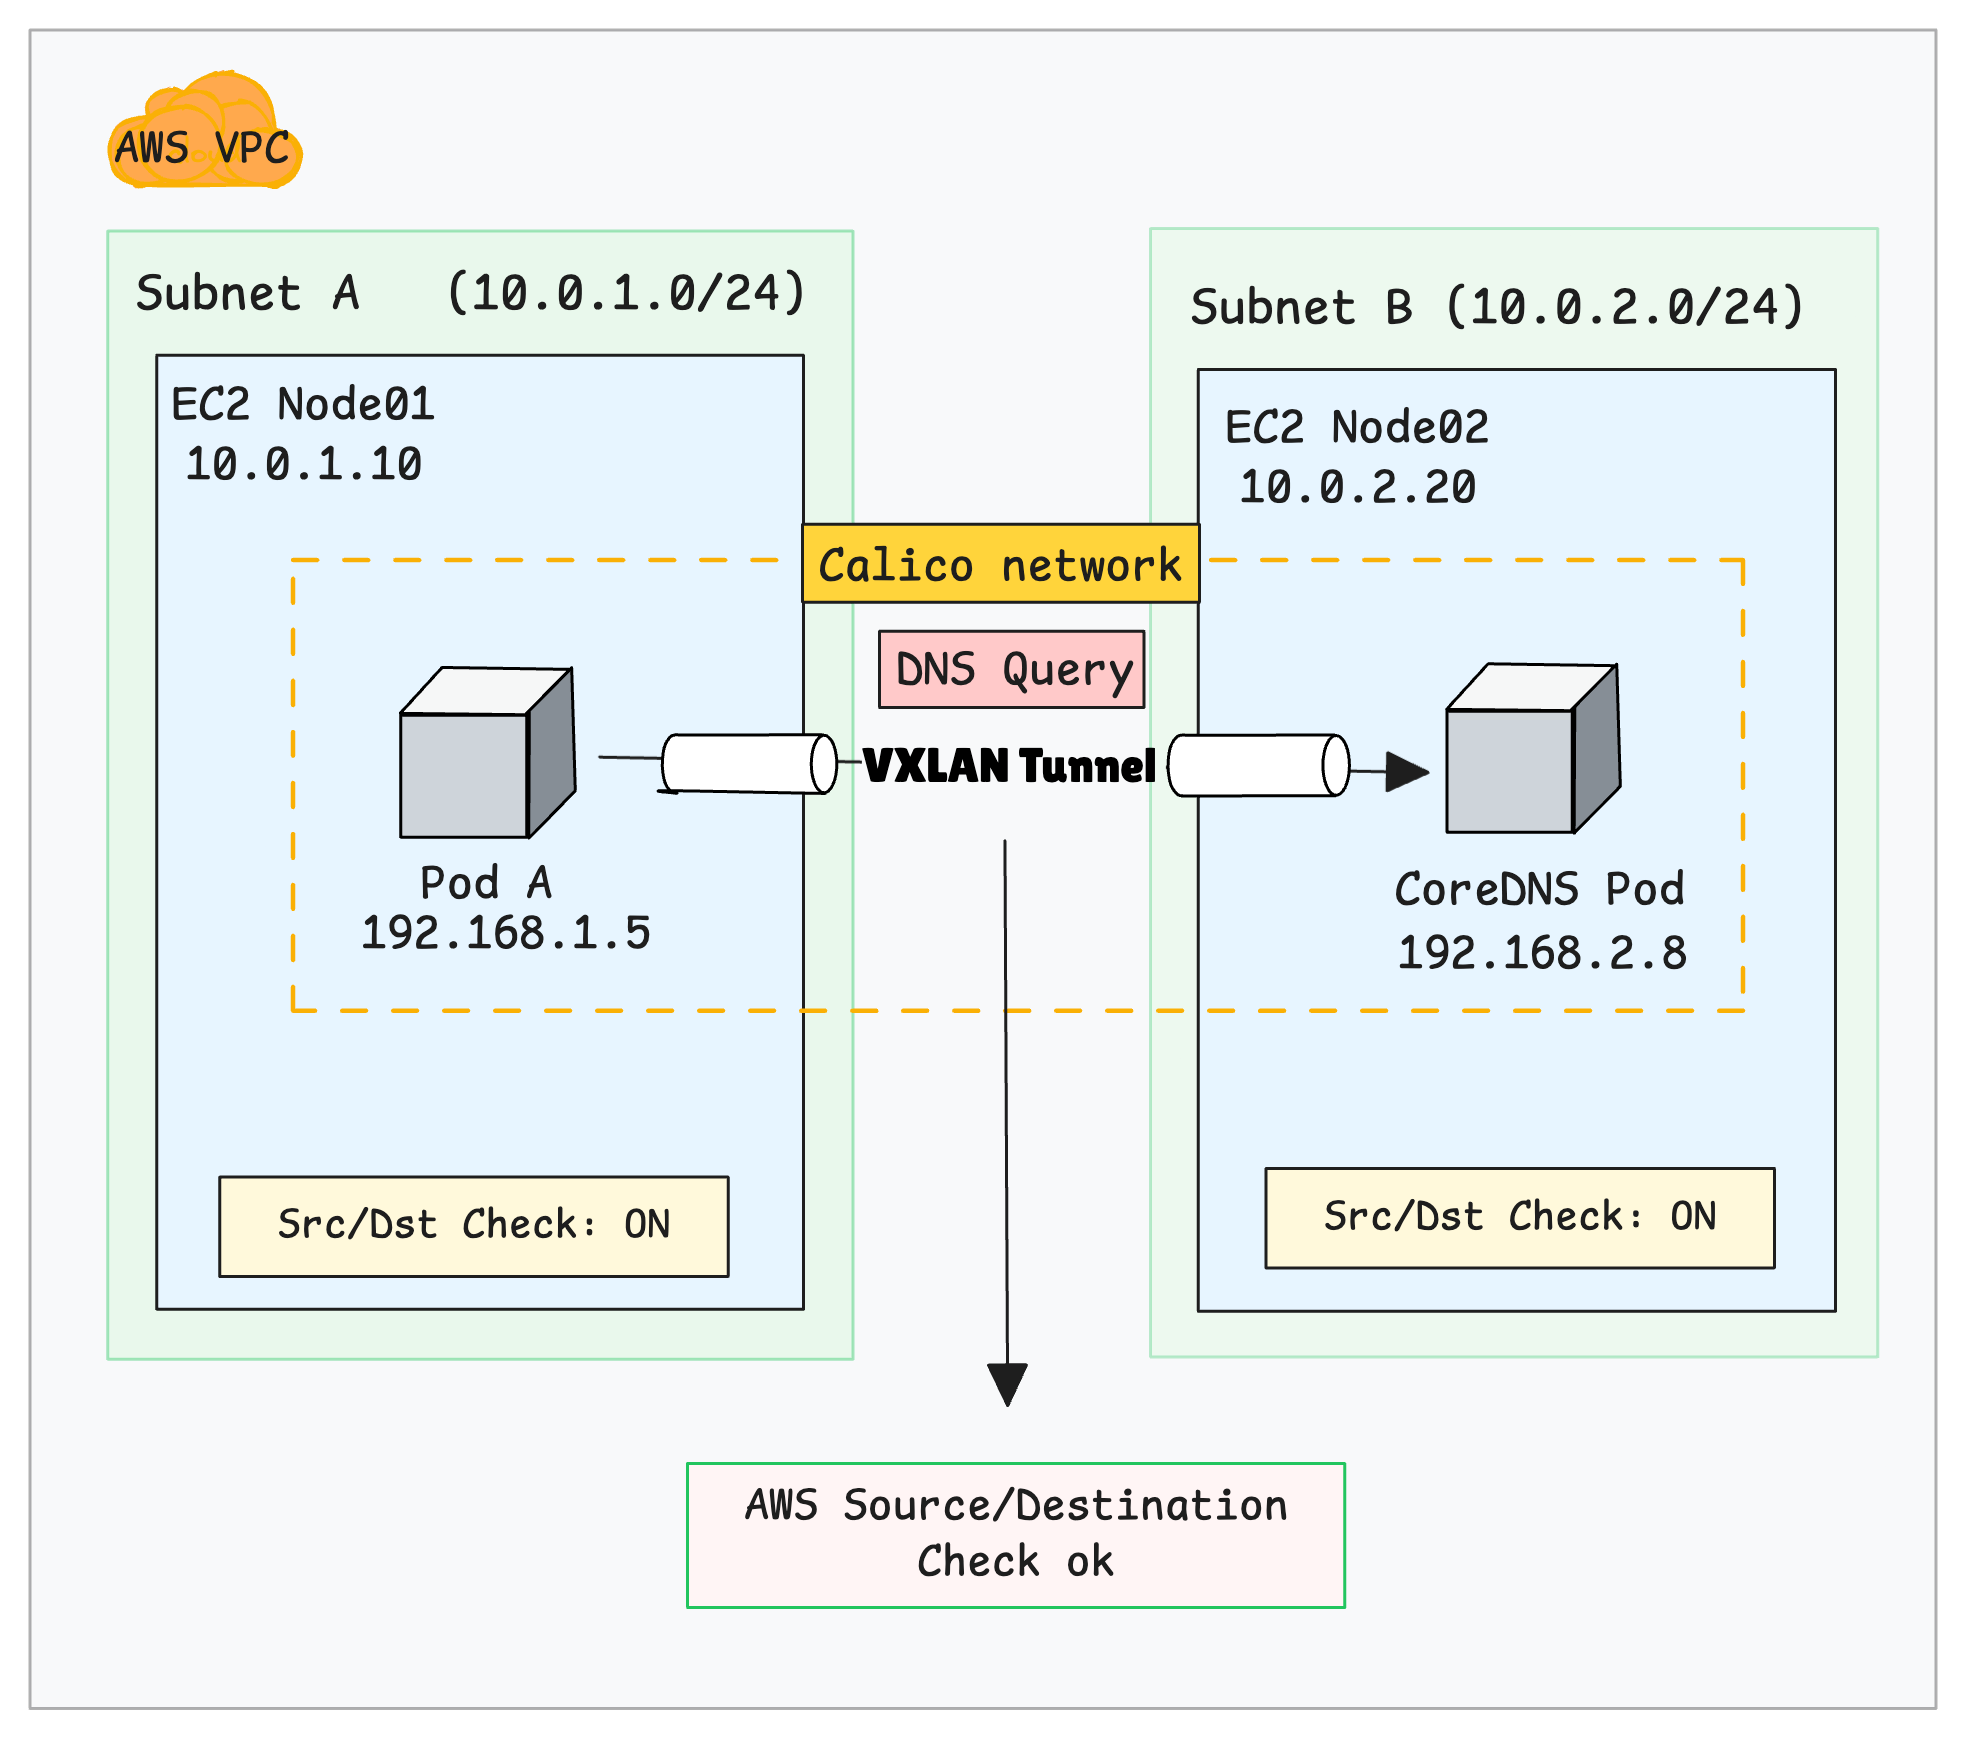
What Happens When Nodes Are on the Same or Different Subnets?
You may be wondering what happens when you have Kubernetes nodes in the same subnet and different subnets at the same time.
As mentioned earlier, when Calico detects that nodes are on different subnets, it uses VXLAN encapsulation by default.
So the same fix explained before works for both scenarios.
Here is the image that illustrates the different subnet scenario.
Performance
Keep in mind that VXLAN adds approximately 50 bytes of overhead due to UDP encapsulation, which may slightly impact performance.
An alternative is IPIP, which has lower overhead. However, VXLAN is the recommended choice when using eBPF mode.
Choosing Between VXLAN and IPIP?
Also, some cloud providers like Azure block IPIP traffic entirely, making VXLAN the only viable overlay option.
The choice between VXLAN and IPIP depends on your dataplane mode (standard vs eBPF) and your cloud environment.
For most setups, especially on AWS with eBPF, VXLAN is the safer and better-performing choice.
Conclusion
If your kubeadm cluster on AWS has DNS issues and you're using Calico with VXLANCrossSubnet, the fix is simple switch to VXLAN mode. This tells Calico to always encapsulate traffic, so AWS never sees your pod IPs.
It adds a tiny bit of overhead, but it saves you hours of debugging silent packet drops. When in doubt on AWS, just use full VXLAN and move on.